Export Internet Explorer Favorites to an HTML file
All your Favorites are stored in a single folder, and can easily be exported from Internet Explorer to an HTML file, and to another computer. In a later tutorial, you will learn how to backup your Favorites by copying bookmarks and folders in Windows Explorer; but, while you can backup your Favorites by exporting them to an HTML file (this tutorial), the primary reason to export your Favorites is to then import Favorites from another computer's Internet Explorer. This tutorial is written with Internet Explorer 8, but also applies to Internet Explorer 7 and 6.
Launch Internet Explorer's Favorites exporter
Start the Favorites export process from the three latest versions of IE:
- In Internet Explorer 6: click on the File menu, and choose "Import and Export".
- In Internet Explorer 7: click on "Add to Favorites" and choose "Import and Export"
- In Internet Explorer 8: click on Favorites, and then "Import and Export".

Tip: in Internet Explorer 8 and Internet Explorer 7, you can also press Alt+F to display the File menu and then click on Import and Export.
Export your Favorites
Internet Explorer has by now opened the Import/Export Settings dialog: select Export to a file, and click Next. The second screen ("What would you like to export?"), let's you pick up to three pieces of information to export from Internet Explorer: select Favorites, and click Next.
The following screen may seem a bit puzzling: this is where Internet Explorer checks which Favorites you want to export: to export all your Favorites, leave the default selection ("Favorites", the folder at the top of the "Select the folder that you want to export your Favorites from" listing), and click Next; if you want to export only Favorites contained in a certain folder, simply select that Favorite folder instead (and click Next).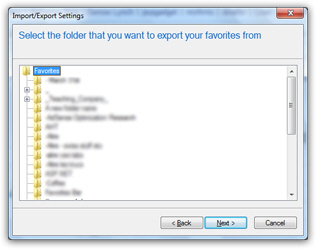
Where do you want to export your Favorites?
Next, Internet Explorer checks in which file you want your Favorites exported: this can either be a brand new file name, or the name of a previously exported Favorites file. The default, saved inside your Documents folder, is: (where "userName" is your actual Windows user name)C:\Users\userName\Documents\bookmark.htm (Windows 7 / Windows Vista)C:\Documents and Settings\userName\My Documents\bookmark.htm (Windows XP)
Either keep the default exported Favorites file name, or click Browse to choose a folder and type another file name. Then, click on the Export button. Depending on your computer's speed, and the number of Favorites you have, the operation will complete within a few seconds; Internet Explorer should then display the following confirmation message: ''You have successfully exported these settings", with a checkmark displayed next to "Favorites":
Click Finish to return to Internet Explorer ...And this is all it takes to export your Favorites to an HTML file, that you can then transfer to another computer. The next tutorial explains how to import Favorites in Internet Explorer: in addition to importing bookmarks from other web browsers, Internet Explorer can import Favorites from a file just like the one we exported.