Send Emails with Mozilla SeaMonkey Mail
 There are four ways to start a new message: reply and reply to all on a selected message, or forward it. In this tutorial, we will show you how to create a new, blank email. Click the "Compose" button in the Mail toolbar, and a blank email will popup. The only "pre-filled" information is your originating email account in a dropdown menu at the top: if you have setup multiple accounts in SeaMonkey Mail, you can switch between them on-the-fly, as you write new messages! All other fields are up for grabs, and we'll go through them one-by-one on this page.
Tip: press Ctrl+M to compose a new message. As an integrated suite, pressing that keyboard shortcut inside any of SeaMonkey's other programs (like the web browser), will open a new email window! (To email the current URL from the SeaMonkey browser, choose "Send Link" or "Send Page" under the File menu.)
Compose a new message
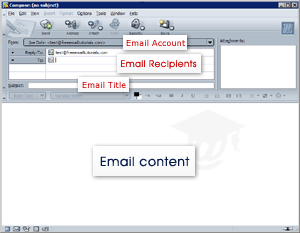 The default email account (in case you have several of them setup) will be visible in the top drop-down menu: from left to right, it should display your name (as you chose it to appear for outgoing emails), your actual email address enclosed in <angular brackets>, and the nickname you gave to your email account.
Underneath is the addressing bar, a text field in which you'll type the names or email addresses of email recipients for your new message. SeaMonkey Mail will show as many lines of recipients as needed; just hit Enter / Return after each email address.
Use the subject line to assign a title to your email: SeaMonkey Mail will give you a reminder, but allow you to send messages without supplying a subject line.
Tip: hint to the message's content - that courtesy lets recipients know if there's any urgency. See our email etiquette tutorial to learn how to choose good email subject lines.
Finally, the email content (also known as "message body") goes in the text area at the bottom. Although they are disabled until you focus in the text area, you can see the text control for "Rich Text Editing," that give you the possibility to format your emails: different font families and font sizes, bold, italic, underlined, numbered lists, etc.
Tip: press the Ctrl+S keyboard shortcut to save in Drafts a copy the email you are currently editing. At that point, you can close the message window, and safely resume editing it (by double-clicking it inside Drafts) at a later time!
Email Formatting
SeaMonkey Mail supports plain text (no bold, colors, underlined text, etc.) and "rich format" emails (including images, smileys, horizontal separators, etc.). Just use the buttons in the formatting toolbar -pictured above- they become clickable once your cursor is inside the body of the message. Because SeaMonkey includes "Composer" (a full-fledged web page editor), pretty much anything you can dream up for a web page can be created in an email!
Here are a few useful formatting keyboard shortcuts:
Ctrl+B Bold
Ctrl+U Underlined
Ctrl+I Italic
Ctrl+L Insert a link
Ctrl+T Fixed-width text (monospaced)
Ctrl+- Smaller text size
Ctrl++ Larger text
Send email attachments
 With SeaMonkey, you can send regular file email attachments, and even web pages as email body! (Click the dropdown arrow in the Attach button.) Sending the entire page saves your recipients a link click, and ensures that they'll see what you wanted, even if the web page has been taken offline in the meantime; on the flip side, it makes your messages much larger (i.e., longer to download).
Tip # 1: to quickly attach a file to your email, click the white area where attachments are displayed, as shown below: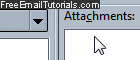
Tip # 2: when using the SeaMonkey web browser, click on the File menu and you'll see two email-related commands. "Send Page" emails the entire web page as email content, and "Send Link" just sends the URL (internet address) of the page in question.
Sending your message
 As soon as you click the Send button (or hit the "Ctrl+Enter" keyboard shortcut), your email is queued in the Outbox folder, where it remains until it is successfully sent (this is where messages-to-send are stored when you send emails while offline, or when your email provider is having issues). After your email is sent, your outbox will be empty, and a copy of the message goes to the Sent folder.
Tip: don't want SeaMonkey Mail to store copies of sent emails in the Sent folder? Go to Edit > Mail & Newsgroups Account Settings; select "Copies & Folders" for the desired email account, and uncheck the "Place a copy in" checkbox.