Setup Yahoo! Mail in Windows Live Mail
 Windows Live Mail & Yahoo! Mail — Yahoo! Mail is the most popular webmail service in the world (second after Hotmail, according to some), with some 250 million users. Windows Live Mail, created by Microsoft, is designed to accommodate both proprietary email protocols like Hotmail's, and standard email protocols like POP3. Yahoo! Mail uses POP3, and can therefore be setup in Windows Live Mail. While Yahoo! Mail is currently the best webmail service available (in terms of interface), it doesn't yet beat the convenience of a desktop email program like Windows Live Mail.
This tutorial shows you how to setup Yahoo! Mail in Windows Live Mail: you will still be able to check you emails from a web browser, as you did before. Please note that in order to check your Yahoo! emails from an email program, you need to pay the yearly $20 for "Yahoo! Mail Plus" service. Third-party plugins like YPOPS allow you to bypass the paid subscription, but these will not be covered in this tutorial.
Despite of rumors according to which you are no longer required to have Yahoo! Mail Plus to check your account from Windows Live Mail, and you can use any regular (free) Yahoo! Mail accounts with Windows Live Mail, the official Yahoo! Mail documentation seems to indicate that you do still need the Yahoo! Mail Plus service.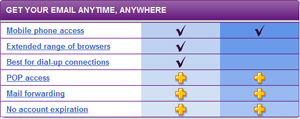
Setting up Yahoo! Mail in Windows Live Mail
Setting up your Yahoo! Mail account in Windows Live Mail is a very straightforward process.
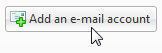 The first time you open Windows Live Mail, the "Add an E-mail Account" dialog automatically opens. If it doesn't appear, locate the "Add an e-mail account" button in Windows Live Mail's left pane; click this button to open the email account wizard:
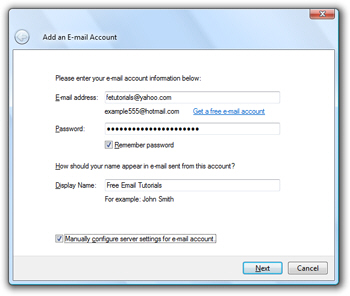
Enter your Yahoo! Mail account information
In the first field ("E-mail address"), type your full Yahoo! Mail email address in the following format yourUserName@yahoo.com:
The second field ("Password") is requesting your Yahoo! Mail password; it is safe to give it to Windows Live Mail. Windows Live Mail will automatically choose to remember your Yahoo! Mail password, but you can uncheck the "Remember password" checkbox if you want.
The last field ("Display Name") determines how emails you send from Yahoo! will appear to recipients. The display name can be anything, and doesn't have to match your Yahoo! Mail user name (the portion of your email address which comes before "@yahoo.com").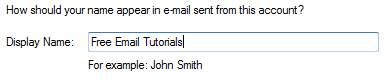
Before clicking the Next button, make sure to check the "Manually configure server settings for e-mail account" checkbox for Yahoo! Mail:![]()
Enter your Yahoo! Mail connection settings
Clicking Next will bring Windows Live Mail's connection settings screen. It includes all the login/authentication data you need to enable a connection to your Yahoo! Mail account: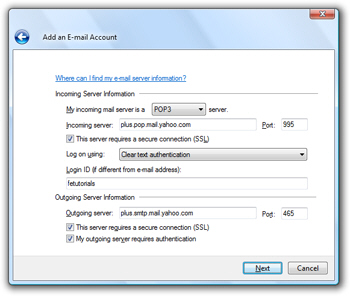
Yahoo! Mail Incoming Server Settings
The top section of this screen deals with Incoming Server Information: in other words, how Windows Live Mail will retrieve your emails from Yahoo!'s servers. Choose "POP3" as server type. The incoming mail server value is plus.pop.mail.yahoo.com, using port 995.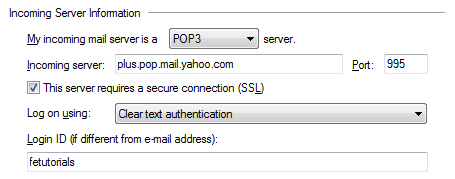
Check the "This server requires a secure connection (SSL)" checkbox. You can leave the default setting for logging on, which is "Clear text authentication". Under Login ID, enter your Yahoo! Mail user name (the part of your email address that comes before "@yahoo.com").
Yahoo! Mail Outgoing Server Settings
The bottom section of Windows Live Mail's email account setup screen contains the Outgoing Server Information, or the connection settings used by Windows Live Mail to send emails through the Yahoo! Mail Plus service: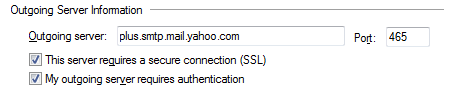
The outgoing server address is plus.smtp.mail.yahoo.com, using port 465. Make sure to check both checkboxes: "This server requires a secure connection (SSL)", and "My outgoing server requires authentication".
Finalizing Your Yahoo! Mail Account Setup
Click Windows Live Mail's Next button; you finished setting up your Yahoo! Mail account. If Windows Live Mail could successfully connect to Yahoo! Mail's servers, it will give you the following confirmation: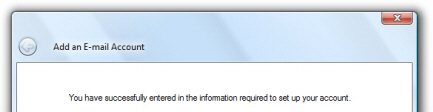
 If Windows Live Mail does not give you this confirmation, it either means that your Yahoo! Mail password was incorrect, that your Yahoo! Mail email address has a typo, or that your Internet connection was faulty. Otherwise, your are ready to use your Yahoo! Mail account.
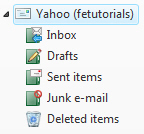
As soon as your Yahoo! Mail account information is downloaded in Windows Live Mail, you will see the standard folders displayed in the left pane, as well as any custom email folders you may have created.
Yahoo! Mail Plus aside from Windows Live Mail access
Aside from the convenience of being able to check your Yahoo! Mail emails right from Windows Live Mail, the Yahoo! Mail Plus upgrade also gives you plenty of advantages compared to the free Yahoo! Perhaps most importantly in our eyes, Yahoo! Mail Plus hides all the ads; also, your account will not automatically be disconnected if you do not check your emails regularly; another useful feature only available in Yahoo! Mail Plus is the ability to setup mail forwarding from your account, to other email accounts. Learn more…