Setup Hotmail in Windows Live Mail (Hotmail Email Account Setup)
![]() Windows Live Mail & Hotmail — This tutorial explains how to setup your Hotmail email account in Windows Live Mail. This still lets you check your Hotmail emails from a web browser like Internet Explorer, but gives you the convenience to check them from a full-fledged desktop email application. Using Windows Live Mail also means that it will store local copies of your Hotmail emails, which allows you to read emails offline, for example.
Windows Live Mail & Hotmail — This tutorial explains how to setup your Hotmail email account in Windows Live Mail. This still lets you check your Hotmail emails from a web browser like Internet Explorer, but gives you the convenience to check them from a full-fledged desktop email application. Using Windows Live Mail also means that it will store local copies of your Hotmail emails, which allows you to read emails offline, for example.
Since June 2008, you can no longer use Hotmail in Outlook Express, and have to switch to Windows Live Mail for Hotmail; Vista and Windows 7 users had to use Windows Live Mail from the start, since Vista Mail never supported Hotmail.
Windows Live Mail is free, and available for both Windows XP, Windows Vista, and Windows 7. If you are using an older version of Windows, you will still be able to check your Hotmail emails from a web browser like Internet Explorer or Firefox.
Sign up with Hotmail to create a new email account
Setting up Hotmail in Windows Live Mail
The process of setting up your Hotmail account in Windows Live Mail is as streamlined as it gets. You will be able to read Hotmail emails and send emails within 30 seconds, literally.
The first time you launch Windows Live Mail after installation, you will be greeted with the "Add an E-mail Account" dialog, or wizard. In the case of a Hotmail account, you only need to supply three fields to be able to use Hotmail from Windows Live Mail. Here are the information you will need for your Hotmail account setup: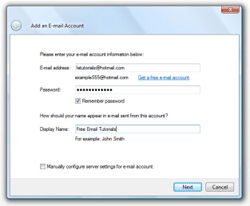
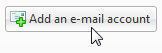 If the new email account wizard does not appear, locate the "Add an e-mail account" button in Windows Live Mail's left pane; click this button to open the email account wizard.
Enter your Hotmail account information
In the first field ("E-mail address"), enter your full Hotmail email address in the following format: yourUserName@hotmail.com. Windows Live Mail's new email account setup wizard displays a "Get a free e-mail account" text link right below the email address field; clicking this link will open your web browser to a page that lets you create your own Hotmail email account in a few steps. Simply ignore this link if you already have a Hotmail account you would like to use.![]()
The second field ("Password") is requesting your Hotmail account's password; it is safe to supply it to Windows Live Mail. By default, Windows Live Mail will remember your Hotmail password for you; if you prefer to supply your password every time (useful if you share a family computer), just uncheck the "Remember password" checkbox.![]()
The last field requested is "Display Name": this field will be used to show the name you pick when you send emails from Windows Live Mail using your Hotmail account. The display name can be anything you like, and does not have to resemble at all your Hotmail user name (the user name is the portion of your email address which comes before "@hotmail.com").
Notice the "Manually configure server settings for e-mail account" checkbox: by default, Windows Live Mail will try to configure your email accounts on its own. In the case of a Hotmail email account, Windows Live Mail always knows how to configure your account.
Finalize your Hotmail email account setup
Click Windows Live Mail's Next button; you finished setting up your Hotmail account. If Windows Live Mail could successfully connect to Hotmail's servers, it will give you the following confirmation:
If Windows Live Mail does not give you this confirmation, it either means that your Hotmail password was incorrect, that your Hotmail email address has a typo, or that your Internet connection was faulty. Otherwise, your are ready to use your Hotmail account.
Downloading your Hotmail folders in Windows Live Mail
Windows Live Mail should automatically connect to Hotmail's mail server, and download email folders and emails you have in your account. If the download does not start automatically, you can manually request it by clicking the Download button. To see the Download button, click in the Hotmail account you just added in Windows Live Mail's left pane.
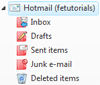 As soon as your Hotmail account information is downloaded in Windows Live Mail, you will see the standard Hotmail folders displayed in the left pane, as well as any custom email folders you may have created.
The standard Hotmail folders are: Inbox, Drafts, Sent Items, Junk e-mail, and Deleted items.
For a more in-depth overview, please refer to our Standard Hotmail Folders tutorial, which discusses each of them.
It is possible to setup multiple Hotmail accounts in Windows Live Mail; if you have, Windows Live Mail will display your user name next to the word "Hotmail" in the left pane.
Hotmail POP3 and Windows Live Mail
Windows Live Hotmail now also supports connecting to the webmail service with the "POP3" email protocol. If you are using Windows Live Mail, however, you will get a much richer experience with Hotmail. Just know that, for other email clients, the option is available: learn more about the Hotmail POP3 settings.