Customize the toolbar (command bar) in Internet Explorer
Internet Explorer 7 and 8 include a "Command Bar", which replaces the main toolbar and menus in earlier versions of IE. This tutorial explains how to customize the Command Bar by showing you how to add or remove buttons, show or hide the text on menus and buttons, switch to large icons or back to small icons, etc. (An earlier tutorial showed you how to easily unlock, move, and lock the other toolbars.)
Show only icons in Internet Explorer's command bar
By default, Internet Explorer shows a mix of text and icons in the command bar (toolbar), as shown on the screenshot below: you can tell that the menus do not show any icon, just text (except for Print menu), and that all the buttons show no text.![]()
Another notable exception is the Favorites button on the leftmost edge of Internet Explorer's main window, which displays both an icon and the word "Favorites". This button is also part of the command bar, and affected by the settings you apply to it.
This tutorial was written with Internet Explorer 8, but this material also applies to Internet Explorer 7.
To show only icons in the toolbar, right-click on any of the buttons or menu, choose Customize, and select "Show Only Icons" from the submenu. Internet Explorer now hides all text from the toolbar, and shows only icons, for both menus and buttons.![]()
Show icons and text labels in the command bar
Alternatively, you can hide all icons to display instead their text equivalent: right-click on the command bar, choose Customize, and this time select "Show All Text Labels". Now, Internet Explorer displays a legend next to each icon:![]()
Reset the command bar's text/icon setting
To revert to the default, simply right-click on the toolbar, select Customize, and then choose "Show Selective Text". Internet Explorer now resets to using icons and/or text in the command bar.
Show large icons in Internet Explorer's toolbar
To show larger icons in the command bar toolbar, right-click, choose Customize, and click on "Use Large Icons" - Internet Explorer will immediately (no restart required) display large icons in the toolbar buttons. To make your icons small again, follow the same steps, but this time uncheck the Use Large Icons menu item (by clicking on it).![]()
Move the Stop and Refresh buttons on the left of the address bar
![]() By default, Internet Explorer 8 displays the Stop button (a red "X") and the Refresh (or "Reload") button at the end of the address bar, on the right; to move these buttons to the left, right-click and choose Customize; then, click on "Show Stop and Refresh buttons before Address Bar" (see screenshot).
By default, Internet Explorer 8 displays the Stop button (a red "X") and the Refresh (or "Reload") button at the end of the address bar, on the right; to move these buttons to the left, right-click and choose Customize; then, click on "Show Stop and Refresh buttons before Address Bar" (see screenshot).
Add or remove buttons from the toolbar (command bar)
Internet Explorer also lets you customize which buttons and menus are visible on the command bar: to add or remove commands/buttons from the toolbar, right-click, choose Customize, and then click on "Add or Remove Commands".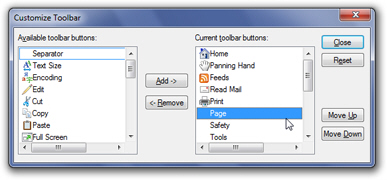
To remove a button from the toolbar, simply select it inside the "Current toolbar buttons" listing, and click on the Remove button. To add a new button, or restored a removed button, select it in the "Available toolbar buttons" listing on the left, and click "Add".
Each of the toolbar buttons listed on the right can be moved up or down in the listing: the topmost command will appear as the leftmost menu / button inside the toolbar. Just click the Move Up or Move Down buttons to change the placement of the selected command.
Add separators in the command bar
 The first item on the left listing is always "Separator" - a separator is displayed as a vertical line that spaces out buttons on the toolbar ("separates" them). On the left screenshot, we added a separator between the Email and Print buttons/commands. A separator can of course be moved or removed.
Reset command bar customizations in Internet Explorer
To go back to Internet Explorer's original toolbar configuration, just click on the Reset button inside the "Customize Toolbar" displayed above. Internet Explorer will re-arrange the toolbar's menus and commands in their original order, and remove any separators you may have manually added.