Request read receipts in Windows Mail + Customize receipt settings
![]() Windows Mail supports read receipts of both ways: you can request a read receipt manually, whenever you send an email, and even configure Windows Mail to automatically (always) ask for read receipts on every message you send from it; these are "outgoing read receipts", the ones you ask from your recipients. But you also have full control over how Windows Mail will handle "incoming read receipts", those requested from you by your senders. You can even customize how Windows Mail will handle read receipts when they are requested from secure emails. Note: Windows Mail doesn't support "delivery receipts" for Microsoft Exchange mail server. This limitation doesn't apply to most email setups; if you don't know what these are, you likely will never need them (in a controlled environment, they let you know if a particular message was "physically" delivered to a recipient's inbox - like recalling sent messages, this works only in an Exchange environment).
Windows Mail supports read receipts of both ways: you can request a read receipt manually, whenever you send an email, and even configure Windows Mail to automatically (always) ask for read receipts on every message you send from it; these are "outgoing read receipts", the ones you ask from your recipients. But you also have full control over how Windows Mail will handle "incoming read receipts", those requested from you by your senders. You can even customize how Windows Mail will handle read receipts when they are requested from secure emails. Note: Windows Mail doesn't support "delivery receipts" for Microsoft Exchange mail server. This limitation doesn't apply to most email setups; if you don't know what these are, you likely will never need them (in a controlled environment, they let you know if a particular message was "physically" delivered to a recipient's inbox - like recalling sent messages, this works only in an Exchange environment).
Manually request a read receipt
To ask read receipts for emails you send, click on the Tools menu and choose "Request Read Receipt": you won't be able to tell, but the option has been enabled. To double-check, click on the Tools menu again, and you should see a checkmark next to the command.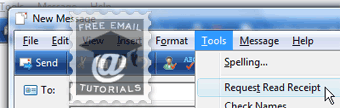 This works well for a message here and there, but Windows Mail includes global receipt request options to automate the process (described next).
Customize your incoming and outgoing receipt requests settings
The first topic we'll explain is how you can customize the behavior of Windows Mail when it realizes that someone requested a read receipt for an email they sent you:
- Go to the Tools menu, and choose "Options".
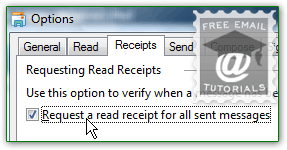
- Click on the "Receipts" tab: the first section deals with automatically requesting receipts yourself - i.e., when you send emails from Windows Mail.
- To always ask for receipts, check the "Request a read receipt for all sent messages" (unchecked by default). Since, depending on their email program settings, your recipients may receive a confirmation dialog whenever they get a read receipt request, enabling this option may become tedious, if not obnoxious.
- The second section ("Returning Read Receipts"), customizes how Windows Mail will behave when it receives receipt requests from your sender; by default, it asks you all the time: (which is the common default for desktop email programs, and explains our remark about how "obnoxious" always requesting receipts can be perceived!)
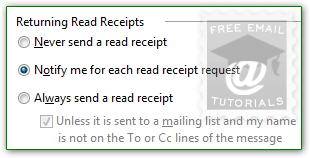 If you select "Never send a read receipt", you will never see the Windows Mail confirmation message about acknowledging those receipts, and your senders will never get a confirmation (they will not receive any kind of information, so they won't know either that you blocked read receipts). Unless you get too many of these requests, we recommend that you keep the default ("Notify me for each read receipt request") - it will tell you when they are anxious to know you read their message, and, in many cases, tell you a lot about the senders themselves!
 - If you take the strategically bold decision to "Always send a read receipt" (select that option), you can setup an exception, which is checked by default when you pick that setting: "Unless it is sent to a mailing list and my name is not on the To or Cc lines of the message". This last checkbox, which you really should keep checked, prevents making you the pariah of distribution lists, to which Windows Mail would otherwise send read receipts to all members! (Mailing lists typically hide recipients, to safeguard their privacy, by listing them in the invisible Bcc field.)
- Once you are done, click on the OK button to apply your new settings.
Secure read receipts
Click on the "Secure Receipts" button to access these options: when you send secure emails, their content (message body) is encrypted using a public and private key. Because read receipts don't include information from the body, the "Request a secure receipt for all digitally signed messages" is disabled (unchecked) by default: The "Sending Secure Receipt" setting mirrors the standard incoming receipts options:
• "Never send a secure receipt" means: don't acknowledge read receipts originating from secure emails - independent from your request settings for "regular" messages.
• "Ask me if I would like to send a secure receipt" - as earlier, this choice (the default) gives you a chance to pick when to honor read receipts -and not- from secure messages.
• "Always send a secure receipt" tells Windows Mail to automatically acknowledge any read receipt requested in secure emails - as earlier, this option takes away your control.
Click OK to save these settings, and OK on the Options dialog to return to your inbox.