Customize junk mail filters (spam) options in Windows Mail
 One of the biggest changes from Outlook Express to Windows Mail is the inclusion of junk mail filters to mitigate spam, and defense against phishing scams. Both of these prevent suspected spam from cluttering your inbox, and these messages will automatically be placed in the "Junk E-mail" folder. The level of filtering can be customized, as you'll learn on this page, including how to make Windows Mail automatically delete junk emails.
Caveat: the options discussed in this tutorial deal with spam "on the client" - in other words, only with messages that arrive into your email program. Depending on the email account you are using, there may also be junk mail filters active on the server, which could prevent spam messages from ever reaching Windows Mail in the first place.
Configure your spam settings
Follow these steps to customize your junk mail filters, from the main window:
- Click on the "Tools" menu and choose "Junk E-mail Options".
- Windows Mail will open the Junk E-mail Options dialog, which contains all settings you can configure to fine-tune spam handling options and behavior.
- The "Options" tab lets you customize the level of junk mail protection you want.
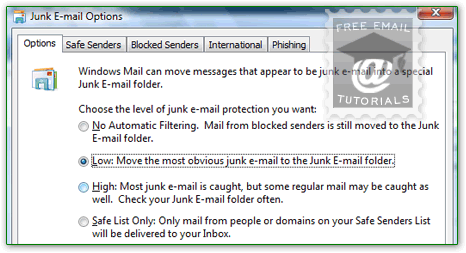
- If you choose No Automatic Filtering ("Mail from blocked senders is still moved to the Junk E-mail Folder"), Windows Mail will not filter out any junk mail — you are in essence turning off the spam filters - this works if your email address doesn't get spammed to death (tip: never post an email address you care about anywhere online, except in trusted sites' contact forms, or as registration username for established websites).
- The second setting is Low: "Move the most obvious junk e-mail to the Junk E-mail folder". This is the default, and in most cases sufficient; note that if your email service provider also offers junk mail filtering, some emails may be downloaded and placed inside its online junk mail folder despite your spam settings in Windows Mail itself. This spam level is also ideal for an email account you use for business: you want all messages to be clearly visible inside your inbox, except for those that are clearly spam. Note: junk mail filters are more art than science, so be sure to check your "Junk E-mail" folder now and then, in case legitimate messages were accidentally filtered - if this is the case, select the message and click on the "Not Junk" button; alternatively, right-click on the message, choose "Junk E-mail", and pick one of the options to guarantee that this sender is considered genuine in the future.
- If you set your spam settings to High ("Most junk e-mail is caught, but some regular mail may be caught as well. Check your Junk E-mail Folder often"), Windows Mail will probably become a bit too aggressive in filtering spam, and you may end up spending too much time marking legitimate email messages as "Not Spam".
- The last setting, Safe List Only ("Only mail from people or domains on your Safe Senders List will be delivered to your inbox"), will only be feasible for unusual cases. Unless you have marked a sender or his/her domain as safe (the part of their email address that comes after the "
@" symbol), every email will be filtered as spam. - Checking the "Permanently delete suspected junk e-mail instead of moving it to the Junk E-mail folder" checkbox at the bottom will force Windows Mail to get rid of suspected spam, bypassing the Junk Email folder altogether.
 Caution: because spam filters are not 100% accurate, we recommend against using that option, which removes the option of occasionally double-checking the content of your spam folder.
That's it with spam options: check the other tabs, which let you control handling of suspicious messages: the "Safe Senders", "Blocked Senders", and the "International" tab in that very same dialog. When done, click OK to save your settings.
Customize your phishing options
Go to Tools > Junk E-mail Options; when the dialog opens, click on the Phishing tab: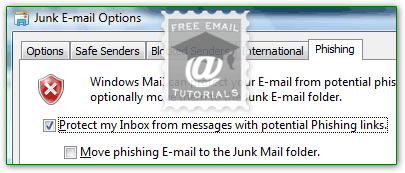
The "Protect my Inbox from messages with potential phishing links" checkbox is checked by default (and we recommend that you keep it that way, because phishing sites often distribute malware or viruses as well). If you want to see them, check the "Move phishing E-mail to the Junk Mail folder" checkbox. Unlike spam, phishing scam attempts are much easier to detect - for this reason, we don't recommend that you move these messages to the spam folder - let Windows Mail get rid of them, so you never see them, accidentally click on a bad link, etc.