Add a signature to email messages you send from Windows Mail
 Emails sent from Windows Mail don't contain contact information by default, except your name and the email address from which you send the message, and any information you chose to manually add to the end of your note to a sender. But Windows Mail supports an "email signature" feature that lets you store multiple signatures, like digital business cards to pick from when sending emails; you can even assign a different signature for each email account you have setup. The content of the "default signature" is automatically inserted, sparing you lots of keystrokes over time! Since signatures are just regular text inside the body of your message, you can just erase them when not needed. Windows Mail also lets you choose if your signature should be added to all outgoing messages, or only new ones (thus excluding email replies and forwards).
Side info: the email signature doesn't technically need to contain your contact information; any text will do. We've seen people integrated "Thanks," to the beginning of their signature, saving them some typing (but also weird looking when they forgot to erase that part, and seem to be thanking you for no reason!)
Create your email signature
This is what you need to do to add your own signature to emails in Windows Mail:
- First, click on the Tools menu, and select "Options".
- From the Options dialog that opened, click on the "Signatures" tab at the top:
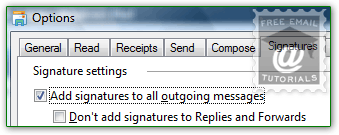
- Under Signature settings, check the "Add signatures to all outgoing messages" checkbox: this tells Windows Mail to automatically add a signature at the end of all emails you send: use it to enable or disable your signature, without having to delete it.
- The "Don't add signatures to Replies and Forwards" checkbox is unchecked by default, and Windows Mail always adds a signature (our favorite setting, which shows your contact information right below the last message you typed). If you check it, your signature will only be added once per conversation thread - it will only be visible at the bottom of a message (where most people won't remember to look for it anyway).
- To create a signature, or add a new one, click on the New button under Signatures: it will by default called "Signature # 1" - before you forget, give it a meaningful label by clicking on Rename (or pressing Alt+M): then, type a name and hit Enter.
- Add your signature content inside the Edit Signature text box; keeping in mind that your emails may be printed, and not always show the email headers on paper. So make sure to also include your name and email address, plus any information your recipients might need, like job title, fax number, website URL, physical address, etc.
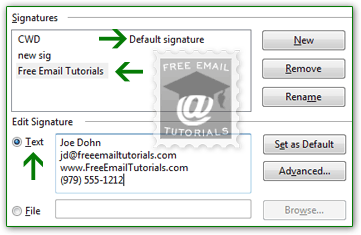
- Notice a few things in the screenshot above:
• The "Default signature" label appears next to the one that will automatically be inserted (see below how to override that setting).
• The selected signature (the one you are editing) is highlighted, in a background color that depends on your Windows settings and theme.
• The "Text" radio button is selected by default, allowing you to directly type a plain text signature inside the adjacent text box.
• Select "File" and click on the Browse button to pick an HTML file that includes more advanced formatting options, (like showing an image in your signature - the picture needs to be reference from an online (live) URL, which will be accessible to your recipients). - To make the one you just created your primary signature, click on "Set as Default"; a single signature is automatically the default, for all email accounts in Windows Mail.
- Click on the OK button to return to Windows Mail. Even if it is visible in the listing, your new signature will not be saved until you click OK!
Note: the signature setting only affects this copy if Windows Mail; if you use your email account from other email programs or webmail clients, you'll need to setup a signature for these as well.
Tip: create an email signature in...Test your signature: back in Windows Mail, click on the Create Mail button (or press Ctrl+N) to compose a message: your new signature was automatically added to the email body!
Tip: if you have multiple signatures, click on the Insert menu while composing a new message, and choose Signature to pick from another of your the signatures - it will add that signature where there was none, or replace the one that was already there.
Associate signatures with different email accounts
You can associate one signature with a particular email account as follows: go to Tools > Options, and select the "Signatures" tab; click on a signature, and press the "Advanced" button next to the text box containing the signature text. Check / uncheck the email accounts you want to assign, and click OK to save; click OK once more to return to Windows Mail.
Deleting a signature
To delete a signature, go back to Tools > Options, and click on the "Signatures" tab. Select with a click the signature you no longer need, and click "Remove". If any email account was associated with that particular signature, they will start using the default instead; if the deleted signature was the default, the first one in the listing automatically becomes the new default. Caution: you will *not* get a confirmation message before Windows Mail deletes the signature, and the deletion cannot be undone (clicking Cancel will not do the trick!)