Send a file as email attachment in Outlook 2007
 There are two ways to send information by email: either include the content inside the body of the email itself, or send a file as attachment. In this tutorial, we will explain how to attach a file to an email in Outlook 2007; we will show you several equivalent ways to add email attachments, and go over the limitations and downsides to emailing attachments (as opposed to, for example, uploading the file online and emailing a link to it instead). Let's start by showing you how to attach a file to an email in Outlook 2007.
Add an email attachment in Outlook 2007
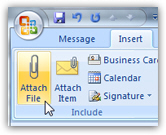 To email a file in Outlook 2007, you must be in the new email window (what Outlook opens when you create a new email, reply to an email, or forward it). From the ribbon, click on the Insert tab; then, click on Attach File. This will open the Insert File dialog, which lets you navigate through the folders on your computer or the network to pick a file.
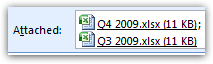
To insert a single file, simply double-click on the file you want; to insert multiple files from the same folder, hold down the control key on your keyboard (Ctrl), and click on each file you want as attachment, one after the other. Then, release the control key and click on the Insert button. All your files are now showing in the Attached bar that appeared below the subject line: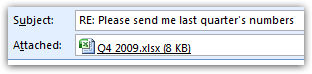
Copy and paste files to attach them to an email
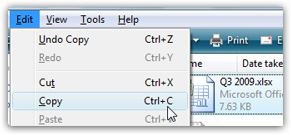 Another way to attach a file to an email in Outlook 2007 is to copy the file in Windows Explorer, and then paste it inside the email. You will notice that Outlook 2007 added the file you just pasted inside the email body as another attachment. Note that if you copied multiple files at once, and pasted them inside your email, you would end up with as many new email attachments as you pasted files!
Drag a file attachment to an email
 Yet another way to create a file attachment in Outlook 2007 emails is to drag the file(s) you want attached from a Windows Explorer window in the background (loaded with the folder containing the files in question), and the new email window in the foreground. Start dragging the files, and then drop them above the body (where the text is) of your new email / email reply / email forward, as the case may be; within a second, a copy of all the files dragged and dropped above the email have been added as email attachment.
As you can now tell, the options to attach a file to an email in Outlook 2007 are limitless! Just pick your favorite approach and use it all the time; in some cases, one approach may be more suitable than the others (which is why it is beneficial to know the various ways in which you can add email attachment in Outlook).
Remove an attachment from an email
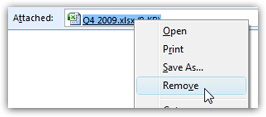 Outlook 2007 lets you very easily remove an attachment from an email; let's say that you accidentally attached the wrong file to your email. No need to start over with a new email: just right-click on the email attachment you want to remove, and choose Remove from the context menu. That's it! All remaining attachments are left intact, as is the rest of your email.
Caveat: email attachments, with or without Outlook 2007
You have to keep in mind a couple of things when attaching files to an email, in Outlook 2007 or otherwise. The files you attach add size to your email; if your attachments exceed a certain size, the email recipient may not be allowed to receive the file (in which case you will usually receive a notice from the email server on the other end, telling you that your email could not be delivered because of its large size).
Second, certain file types are automatically considered dangerous by email programs or mail servers, which may block them. To circumvent this downside, send your email attachments in a zip archive. (Click on an empty area of a folder, choose New > Compressed (zipped) Folder (the actual wording depends on which version of Windows you use).
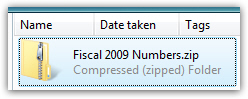 After naming your zip file, double-click to open it, and drag or copy-paste the files you want attached inside the zip archive. At that point, add the zip file as attachment to your Outlook 2007 email (instead of the individual files).
If you have access to a live web server, or a SharePoint server, you can upload the file and email a link to it; likewise, if your email recipient has provided FTP functionality and credentials you can use, upload the files to his/her server, and email him/her that the files are uploaded.