Create mail filters (email rules) in SeaMonkey Mail
SeaMonkey Mail supports mail filters (aka email rules) to automate the process of managing your emails; choose a few conditions, and setup an action it will take on the matched messages, and you are done! Unlike many email programs, SeaMonkey uses a single screen (as opposed to wizard steps), which makes the process much more intuitive. If you've ever created smart playlists in iTunes, you'll know right away how filters work in SeaMonkey!
Setup your first mail filter!
 From the main SeaMonkey Mail window, click on the Tools menu, and choose "Message Filters": make sure that the correct email account is selected under "Filters for" (top left - note). Then, click on the "New" button. The resizable dialog shows available conditions at the top, and actions at the bottom.
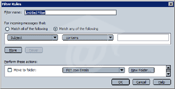
Type a memorable label in the Filter Name text field. Pick the context in which the filters will run: the default option of "Checking Mail or Manually Run" is fine, and means that SeaMonkey will check emails against your conditions whenever it downloads new emails or when you manually run rules (see tip below). But know that other options are available.
Tip: to manually run your filters, go to the Tools menu, and select either "Run Filters on Folder" (check the entire current folder) or "Run Filters on Message" (check if rules should be applied to the currently selected message). These commands are useful when you import emails, or when you copy emails into SeaMonkey, from another application.
Setup a trigger (conditions)
Select a type of information to match in the first dropdown: a subject line, sender (From), content of the message (Body), a Date, etc. Advanced tip: if you want to match messages based on a custom email header, click "Customize" at the bottom to set it up.
Then, select an equality option: contains, doesn't contain, is (meaning: exactly matches what you'll type in the next field), isn't, begins with, or ends with. The first choice, "contains", is the most flexible. Note that filters are not case-sensitive (uppercase/lowercase doesn't matter). Finally, enter a term to match in the text box. That criterion has now been added at the below. To delete any of the rules you've just added, click the minus button (" - ") next to it. To add a new condition, click on the "Add a new rule" button (plus sign, pictured above).
Tip: if you have setup multiple conditions, notice the radio buttons above the listing. If "Match all of the following" is checked (default), the filter will only be triggered if all your criteria are matched. Select "Match any of the following" for more flexibility (the filter will run if one of the conditions is met).
Assign an action
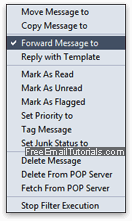 Choose one of 14 available actions at the bottom of the dialog: moving or copying emails to a folder, automatically forwarding or replying to a message (so cool!), marking it as read, unread, flagged, deleting it from the server, and much more. Also notice the last option, "Stop Filter Execution": it allows you to exclude matched messages from email rules. You should know that this last option exists, even you're not likely to need it often.
Once you picked an action, pick a choice from the dropdown that appears next to it, or type a value in the text field. Click on the plus sign to add this action, and optionally pick other actions to perform on the matched message. Carefully review your actions to make sure that they don't conflict with one another.
Recording your mail filters' actions
SeaMonkey includes a feature that allows you to keep track of actions automatically taken on your behalf through filters, but it is disabled by default. To turn it on, click on the "Filter Log" button. Click "Enable the filter log" and click Close; from now on, all actions will be recorded, and accessible by clicking on the Filter Log button. Click the "Clear Log" button at any point to delete all but future entries.
Save your rule, pause it, or edit it after the fact
Click "OK" to save your new mail filter. It will now run automatically (or not, based on the context you picked earlier), and is available either way from the Tools menu.
To change a filter's actions or conditions after the fact, go to Tools > Message Filters, and double-click on the email rule to update (or select it and click Edit).
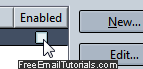 To pause a rule (temporarily disable it without deleting it), uncheck its "Enabled" checkbox in the same dialog (Tools > Message Filters). By default, all new filters are set to Enabled. Click the close button or hit escape (Esc) to return to SeaMonkey.