Change or set the default printer in Windows 7
 Windows 7 lets you set as default printer either a real, physical printer, or a "print driver", which is a special piece of software that you can use for printing documents - the most common such print drivers are Acrobat's "
PDF" and Microsoft' "XPS". In this tutorial, we will explain how to change your default printer to whatever you want, a real printer connected to your computer, a print driver of your choice, or even a "network printer" (a printing machine of some sort that is available on your HomeGroup -local network- either through wires, or wirelessly). Since Windows 7 lets you also share printers on your network, the actual printer that will print your papers can be anywhere in your house of your office building!
Tip: learn how to Set the default printer on Windows Vista
Change your default printer in Windows 7
Follow these steps to make another printer the default for your computer:
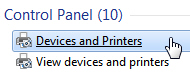
- Click on the start menu, and type "printers" in the search field.
- Then, either click on "Devices and Printers" or "View devices and printers" - both links will open the "Devices and Printers" screen you want in the Control Panel.
- Windows 7 will load all devices (peripherals like scanners, mice, keyboards, etc.) and "printers" (actual printers cable-connected to your PC, network printers, fax machines, and print drivers - anything Windows 7 can use to print documents to).
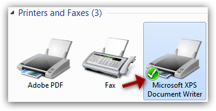
- If needed, scroll down until your see the section labeled "Printers and Faxes":

- If you see "Printers and Faxes", but no icons (as shown on the screenshot above), click on the disclosure triangle to expand the content of Printers and Faxes: Windows 7 will display all "printers" and faxes it found for your computer.
- You can easily spot your current default printer, because it has a green checkmark displayed above its icon, in overlay (as you can see on the screenshot, the Adobe PDF print driver is the default Windows 7 printer in our case).
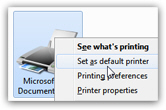
- If you already had the correct default printer, you can close the Control Panel; otherwise, right-click on the on the printer you want to set as default, and choose "Set as default printer" from the context menu:
- Windows 7 will immediately apply the change, and make the selected item your default printer; as visual confirmation, you will see appear a green checkmark on the new default printer, as shown below:
- This is all it takes to change your default printer in Windows 7! You can now close the Control Panel and return to your work.
Tip: to test your default printer, press Ctrl+P while on this page; this is the universal keyboard shortcut to print things in Windows 7 (hold down the "Ctrl" key, and press "P" while the Ctrl key is still held down). The "Print" dialog will open, with your default printer automatically selected; you can still of course choose to print to another printer by selecting it instead.