Change screen resolution in Windows 7
 The setting that determines how many pixels you can see on screen at any given point in Windows 7 is your "screen resolution". There is no standard screen resolution for Windows, since it basically depends on your hardware (either your monitor/display itself, your graphics card, or the dimension and proportions of your laptop screen). In this tutorial, we will show you how to change screen resolution in Windows 7. Note that the process works in exactly the same way for all editions of Windows 7 (Home Basic, Home Premium, Professional, Ultimate, etc.)
How to test and switch to a different screen resolution
Follow these steps to try out other screen resolutions for your monitor:
- First, minimize all windows, so that you can see your desktop.
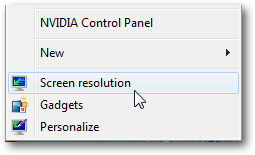
- Then, right-click on an empty area of the desktop (not on an icon or file, otherwise you'll see a different kind of context menu).
- From the menu that appears, choose "Screen resolution", as shown below:
- Windows 7 will open the Control Panel, with the "Change the appearance of your display" screen automatically selected. Depending on your hardware configuration (like having multiple monitors hooked up to your computer), you may see something a bit different than the screenshot below, but the main elements will be there:
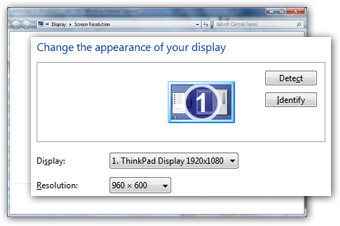
- The "Display" dropdown menu is the one that allows you to adjust your screen resolution; click on it, and it will show all the screen resolution settings currently available for your monitor / computer.
- For your safety, Windows 7 will try the selected screen resolution once you click on the "Apply" button, and automatically revert to the original setting within a few seconds if your PC has a problem (like inability to see what's on screen, etc.)
- Click on the "OK" button to apply and use the new screen resolution and return to Windows. Each user account can have its own screen resolution, which Windows 7 will remember even after you logoff and/or turn off and restart the computer.
Tip: you can also open the start menu and type "screen resolution" in the search field, then click on the "Adjust screen resolution" link displayed in the search results to open the corresponding screen in the Control Panel.
Fixed aspect ratio, image distortion, and stretched screen resolution
If you like a screen resolution, but it doesn't match the dimensions of your monitor / display (i.e., everything is squeezed vertically or horizontally, and proportions are not "constrained"), you will need to customize your video card settings or monitor control panel.
To configure different display settings for your graphics card, click on the "Advanced settings" link on that same Control Panel screen, and select the tab that corresponds to your video card (ATI, Intel graphic accelerator GPU, NVIDIA, etc.) For NVIDIA cards, you typically go under "Change flat panel scaling" and select to use scaling with fixed-aspect ratio: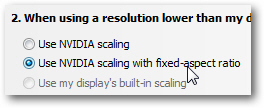
This is all it takes to adjust your screen resolution in Windows 7! And since the setting can be changed so quickly, you can switch resolution depending on the task you perform or the program you are using (higher screen resolutions mean that more "things" are displayed on the screen, but that they are all smaller - a lower screen resolution will make things easier to see on your screen, regardless of the actual size of your monitor).