Create a new label in Gmail (virtual email folder)
As you probably know by now, Google Mail / Gmail doesn't use "physical" email folders like most other webmail services or email programs - instead, it relies on Labels, or virtual folders, some of which are automatically generated for you. But Gmail also lets you create your own custom labels to organize your email messages into manageable categories. In this tutorial, we will show you how to create a new label in your Gmail account, and how to apply it to one or more selected email messages in your inbox (for example).
Make a label in your Gmail account
Once you are logged into Gmail in your web browser, inside your inbox, follow one of the steps outlined below: you will see a few different ways you can use to create labels in Gmail, just pick the one you want every time based on personal preference or circumstance.
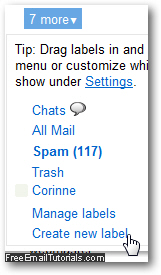 One way to add a label in Gmail is to look at the bottom of your current labels, which are listed inside the left pane; depending on the number of existing labels you have, you should see a dropdown menu that reads "X more" (shown on the screenshot, edited down to show only the essentials), where "X" is of course your actual number of additional labels displayed under the dropdown menu.
- Click on the "Create new label" at the very bottom of the menu, and Gmail will display the "New Label" dialog prompt, which lets you pick a name for it:
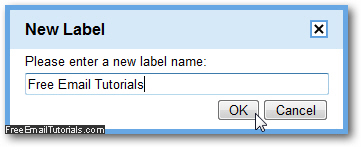
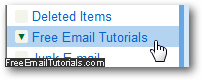
- Once you have typed a new name for your label, click on the OK button and Gmail will add it to your existing list of labels, and make it available for emails you'd want to categorize under it - it now appears in the left pane:
- When an email message is selected, just click on the Labels menu, and choose the new label you just created from the list and the selected email will appear in it.
- Another way to make a label in your Gmail account is to click on the "Labels" menu we just mentioned: at the very bottom of it, you'll see a "Create new" menu item - just click on it to add a new email label.
- Yet another way to create new labels in your Gmail account is through the Settings: once you are looking at your settings screen, click on "Labels", and in the second portion of this tab, type a new name in the "Create a new label" text field, and click on the "Create" button visible next to it:

And these are three ways you can use to create labels in your Gmail account! As you'll learn in the next tutorials, you can temporarily hide a label, or even permanently delete labels.