Add an email sender as contact in Gmail
The previous tutorial explained how you can manually create new contacts in your Gmail account, by entering their profile information (name, email address, phone number, etc.) In this tutorial, we will show you an even faster way to populate your Gmail contact list, provided you have in your inbox an email message from the person you wish to add to your virtual address book. Depending on how this person has setup their profile, this approach can save you quite a bit of typing.
Create a new contact out of an email sender
Follow these simple steps to convert a regular email sender into an actual Gmail contact:
- First, login to your Gmail account from a web browser.
- Once you are signed in, locate an email from the person you want to add as contact, and click on that message.

- Gmail will open the email in "full view", where you can see the entire message, as well as basic "email headers" (sent from, sent to, sent date and time, etc.)
- Notice that on the right hand side, there is a dropdown menu labeled "Reply" - if you click on the "Reply" portion of it, Gmail will create an email reply, but if you click on the dropdown arrow, a menu will be revealed, as shown on the screenshot below:
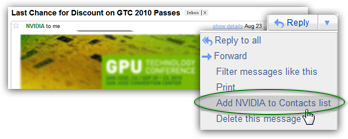
- The menu will contain an item that reads "Add [contact-name] to your Contacts list", where "[contact-name]" is the display name the email sender has chosen - in other words, instead of showing the message as coming from the sender's email address, it shows a more user-friendly name. In cases like these, it means that, from a single email, you will get both the new contact's name, and his or her email address - that much less to type in your address book!
- Without redirecting you away from your inbox, Gmail will display a confirmation message at the top of the page, showing that the selected email sender has successfully been added to your contact list.

- If you want to manually check what Gmail has done in your address book, just click on the "Contacts" link on the left to load your contact list: then, locate the new contact among the others, and click on his/her entry.
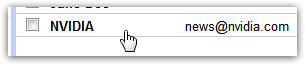
- Just from looking at our example, you can tell that Gmail used both the sender's name and email address for the new contact's information:
- At this point, you can either load the contact's profile and add more information, or return to your inbox. Either way, using the "add sender as contact" method saved you time and typing as opposed to entering everything yourself!
Next time you're on Facebook, ask all your friends to send you an email, so you can added this way; as mentioned earlier (this may apply to you or not), Gmail also allows you to import as a batch a full contact list, which is even faster. (We'll link to that tutorial once it goes live!)