Email signature options and settings in Windows Live Mail
![]() This free email tutorial shows you how to customize email signature handling in Windows Live Mail. We will also show you how to associate signatures with email accounts, how to automatically insert a signature in some or all outgoing emails, and how to manually insert a signature from a new email compose window. This tutorial also explains how to set your default email signature.
This free email tutorial shows you how to customize email signature handling in Windows Live Mail. We will also show you how to associate signatures with email accounts, how to automatically insert a signature in some or all outgoing emails, and how to manually insert a signature from a new email compose window. This tutorial also explains how to set your default email signature.
Email signature options in Windows Live Mail
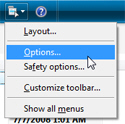 Customizing email signatures in Windows Live Mail is done through the Options dialog: to open the email signature options, click on the Show Menu button, and click Options. If you have traditional menus visible (hidden by default), you can also go to Tools > Options.
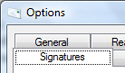
Windows Live Mail's Options dialog will open: click the Signatures tab. This single tab allows you to create and manage your signatures, and customize the way Windows Live Mail handles them.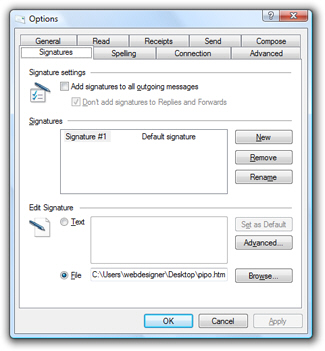
 All email signature options and settings available in Windows Live Mail are conveniently located under the same tab: anything related to email signatures is there. The only exception, explained further down this tutorial, is the manual insertion of a signature from a new email window.
Turn on or off automatic email signatures
The screenshot below displays the default email signature options in Windows Live Mail: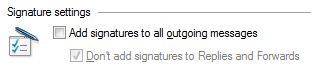
Windows Live Mail will not automatically add any signature to outgoing emails; check the "Add signatures to all outgoing messages" checkbox, and an email signature will always be included. Notice that the second option is now clickable: by default, "Don't add signatures to Replies and Forwards" is turned off. This means that your email signature will only be added to new email messages you compose.
Unless your signature is particularly long, it makes sense to include it also in email replies and forwards (and will save you have to sign your emails).
Set your default email signature
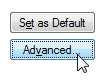
![]() Setting your default email signature in Windows Live Mail takes two clicks: from the Signatures tab of the Options dialog, click on the signature you want as default, and click the "Set as Default" button.
Setting your default email signature in Windows Live Mail takes two clicks: from the Signatures tab of the Options dialog, click on the signature you want as default, and click the "Set as Default" button.
If the button is disabled (grayed out), it means either that you have only one email signature (in which case it is automatically the default signature), or that the email signature you selected is already the default signature.
Assign an email signature to an email account
 Windows Live Mail lets you associate email signatures with particular email accounts. To do so, first select the email signature you want to assign, and click the Advanced button, under Edit Signature, to select one or more email accounts. The Advanced Signature Settings dialog will open, and list all email accounts you have set up.
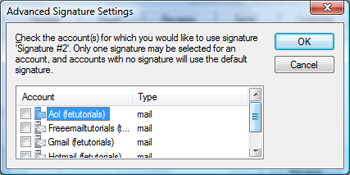
Select the checkbox corresponding to the email accounts you want to tie with the selected email signature, and click OK. You're done! (Don't forget to click OK to close Windows Live Mail's Options dialog to confirm your changes.)
Manually insert a signature in a new email
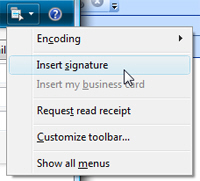 Regardless of your email signature settings, Windows Live Mail always leaves you the option to manually insert any email signature when you compose a new email, reply or forward another. To manually insert a signature, click the Show Menu button, and choose Insert signature.
If the "Insert signature" menu item is disabled (grayed out), you either have not already setup an email signature, or your cursor is in the To, Cc, Bcc, or Subject field. You need to have your cursor (insertion point) inside the body of the email to be able to insert a signature.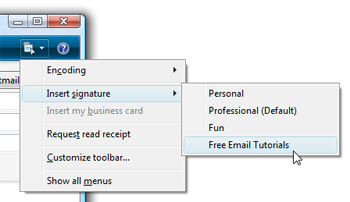
As soon as you have setup multiple email signatures in Windows Live Mail, the Insert signature menu item expands into a submenu revealing all available signatures. Pick the one you want, and it will be added in your email.