Create email filters in Hotmail ("Email Rules")
 Email filters in Hotmail — Nearly all modern email programs allow you to setup automatic mechanisms ("email rules", or "email filters") to manage your mail messages; although it is less common for a webmail client, Hotmail supports email filters. In this tutorial, you will learn how to setup email filters in your Hotmail account, how to edit pre-existing email rules you created, and how to delete email filters once you no longer need them. Unfortunately, since Windows Live Hotmail also calls "filters" its junk mail filters, there may be some confusion between the two features. (Outlook calls this feature "email rules", so this tutorial will use these two expression interchangeably, especially when there could be ambiguity with Hotmail's junk mail filters.)
Add an email filter to your Hotmail account
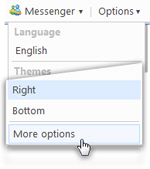 To setup a new email filter inside your Hotmail account, click on the Options menu in the middle top right of the screen, and click More options. This will bring you to your Hotmail account management screen, which lets you configure options and settings.
Under the third section of this page ("Customize your mail"), click on the Automatically sort e-mail into folders link. This is where you create and manage your Hotmail email filters: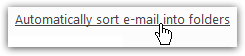
This centralized screen allows you to create new email filters, edit the rules of an existing filter, or delete an email filter altogether:
Customize the rules of your Hotmail email filter
Click on the New filter button to setup a new automatic rule to handle incoming mail; the next screen, "Edit filter", contains all the settings you can configure for a filter. First, you need to specify which messages are to be targeted by the filter: you need to supply three pieces of information.
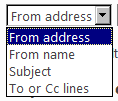 With the first dropdown menu, Hotmail gathers the part of the email on which you will base your email filter rule: From address means that the mail messages targeted will depend on who sent the email; From name, on which display name the email is coming from; Subject will determine whether or not to filter the email based on words the subject line may contain or not contain. Finally, the To or Cc lines option lets you capture emails based on whom they were sent. (The Bcc option is not available, since blind-carbon-copied senders are not included in the Hotmail email headers of other recipients.
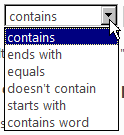 The second dropdown lets you tell Hotmail how to handle the word(s) you will type in the final field (a text field). The contains option means that the word(s) you are looking for will be part of the field (e.g. typing "Hotmail" for a From email rule and choosing "
contains" would match any email coming from someone using a Hotmail account (or, more accurately, anyone whose email address contains the word "Hotmail" somewhere). For clarity, let us now skip to the third choice: equals. Unlike "contains", choosing "equals" means that the field you are trying to match should be exactly as you enter it, without a single extra word or missing word ("equals" is a strict filter and "contains" is loose).
The filter option "contains word" differs from "contains" in that it looks only for full-word matches, and not letter matches. Example: if you are trying to filter emails containing the word "Hotmail" in the subject line, an email whose subject is "I have a hotmailaccount" would be filtered with "contains", but would not be filtered with "contains word", because in that case, "Hotmail" is part of a non-existing word ("hotmailaccount"), and not a standalone word. Put differently: "contains word" actually means "contains these letters as a separate word".
The ends with and starts with options are self-explanatory, but keep in mind that Hotmail email filters or not case-sensitive: in other words, it capitalization of letters does not matter in your email rules: "Hotmail" is considered equal to "Hotmail" or "HoTMaiL", etc.
In the final field, type the words to match in your email filter: (this particular rule only illustrates the role of email filters in Hotmail, since emails matching the rule below should automatically be sent to the junk mail folder without intervention on your part)
Setup an action for your Hotmail email filter
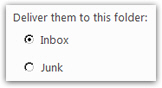 Now that we've defined the pattern to match by the email filter, we need to tell Hotmail where to put these emails. The first two choices will move your emails inside one of the standard email folders: in the first case, this email filter will guarantee that filtered emails will be moved to your Hotmail inbox (and not accidentally marked as spam). In the second case, this filter will ensure that matched emails are placed in the Hotmail junk mail folder.
The next choices reflect the set of custom email folders you have created in your Hotmail account. Let's look at the last two choices for our email filter: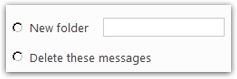
If you choose New folder, Hotmail will automatically create a folder matching the name you type, and automatically move emails matched by this email filter inside that folder. If you choose Delete these messages, Hotmail will automatically delete these email messages before they even reach your inbox.
If you choose to make your email filter Delete these messages, matched emails will not be visible inside the Deleted items folder: they will be deleted before they even reach your Hotmail account, so trade with care when using this email rule option!
Save your new Hotmail email filter
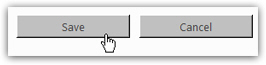 When you are done, click on the Save button to save and activate your new email filter; Hotmail will start right away looking for emails defined in your email filter, and automatically sort these emails accordingly.
Edit email filter rules in Hotmail
To edit the rules of an existing email filter, go to Options > More options from the main Hotmail window; then, click on Automatically sort e-mail into folders. You will see the list of all Hotmail email filters you have setup in the past. Find the email filter you want to edit, and click the corresponding Edit button: this will bring you back to the email filter editor you used when creating the filter, and will let you adjust its rules.
Delete a Hotmail email filter
Once you decide to disable or remove an email filter, simply follow the same steps we just outlined: as you can see from the screenshot above, each email filter you have created has a Delete button next to it (next to the Edit button). To permanently delete the email filter, click on Delete: Hotmail will display a confirmation message before deleting the filter in question; if you click Yes, Hotmail will delete the filter, and reload the email filters screen (where the deleted filter no longer appears).![]()
Tip on deleting filters: Since Hotmail email filters are quick to create and delete, re-creating a deleted email filter later on is not that difficult or time-consuming; but if you want to save an email filter for future use, you can "disable it" by modifying its rule to work with parameters that will never be matched (for example by adding made up words inside the text field for the first rule - and then changing them back to something relevant once and if you decide to reactive this email filter for your Hotmail account).