Setup Yahoo Mail in Windows Mail
Setting up your Yahoo! Mail email account in Windows Mail is not difficult, and only takes 2-3 minutes. This tutorial explains how to setup Yahoo! Mail in Windows Mail, but before we start, you need to know that Yahoo! currently only offers POP3/IMAP access to their webmail service to "Yahoo! Mail Plus" subscribers. This is a variant of the free, core email service that includes more features, extended features, and the complete removal of ads; this service costs about US $20 per year. Since Yahoo! Mail users who check their emails from an email program like Windows Mail do not see ads, Yahoo! only allows paying subscribers to connect to their webmail service from an email program. (In other words, this allows the Yahoo! Mail team to make Yahoo! Mail a profitable product worth developing since users generate income either through their clicks on ads, on the other hand through their annual subscription fee.)
Subscribe to the Yahoo! Mail Plus email service.
Setup Yahoo! in Windows Mail
Start by adding a new email account in Windows Mail by going to Tools > Accounts; this will open the Internet Accounts dialog that contains any email account you have ever setup in Windows Mail. To add your Yahoo! Mail account in Windows Mail, click on the Add button: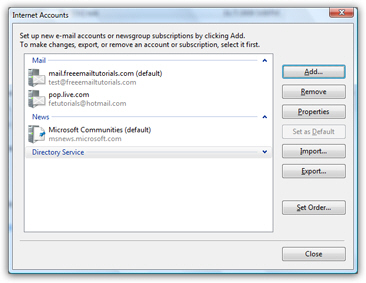
New Yahoo! account configuration settings
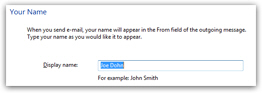 In the Select account type window that opened, click on E-mail Account, and click Next. The next screen collects your "Display Name" information: this is where you will need to type your full name, as you would like it to show to email recipients who receive emails from your Yahoo! Mail account, that you have sent from Windows Mail. (This an is important distinction, since emails you send from your Yahoo! Mail account from a web browser like Internet Explorer will use as display name whatever display name you have set in your Yahoo! account profile.) Click Next.
The next screen collects your email address: enter your full Yahoo! Mail email address in the form "userName@yahoo.com" (where "userName" is your actual Yahoo! user name). Double-check the spelling of your email address, and click Next.
Yahoo! Mail server settings
In this screen, Windows Mail is collecting the mail server settings of the account you are setting up: in this case, we will enter the Yahoo! Mail server settings.
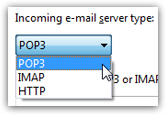 Under Incoming e-mail server type, choose "POP3" (it, "IMAP", and "HTTP" are just different kinds of email protocols).
The next two text fields collect the incoming and outgoing mail servers for Yahoo! Mail: these are basically internet addresses that Windows Mail will use when checking for new Yahoo! emails on the server, and for sending emails via your Yahoo! account from within Windows Mail - respectively.
Under Incoming mail (POP3 or IMAP) server, enter "pop.mail.yahoo.com" - this is the Yahoo! incoming mail server name. Under the Outgoing e-mail server (SMTP) name text field, type "smtp.mail.yahoo.com" - this is the address of Yahoo's outgoing mail server.
Make sure that the Outgoing server requires authentication checkbox is checked. This instructs Windows Mail to use your Yahoo! account credentials when sending an email from your Yahoo! account (this is just a security measure that helps prevent mail servers be used as spam relays). At this point, your Yahoo! Mail account setup should look like this: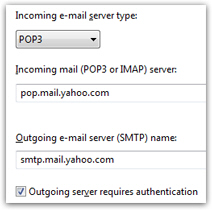
Setup your Yahoo! Mail account credentials in Windows Mail
Click Next to enter your actual Yahoo! Mail credentials: type in your Yahoo! account user name in the E-mail user name text field: this is the portion of your Yahoo! email address that comes before the "@" symbol. Under Password, type your Yahoo! Mail account password.
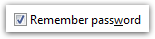 Unless your computer is shared with people you mistrust, we recommend leaving the Remember password checkbox checked: this will spare you from constantly having to manually enter your password when Windows Mail checks for emails on the server, or whenever it tries to send an email using your Yahoo! Mail account.
Yahoo! Mail in Windows Mail
Click Next: congratulations! You have successfully setup Yahoo! Mail in Windows Mail, and will now be able to send and receive emails from the comfort of Windows Mail, using your Yahoo! Mail account. The final choice you have in this email account setup is whether or not Windows Mail should immediately download emails from your Yahoo! Mail account: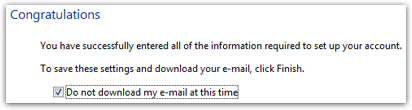
 If you check the Do not download my e-mail at this time, Windows Mail will let you close the new email account dialog without starting to check for new Yahoo! emails right away.
Make your decision, and click Finish to conclude the email account setup process: Windows Mail now brought you back to the Internet Accounts dialog, where you now see your Yahoo! Mail account, alongside any other email accounts you may have previously setup in Windows Mail.
Click on the Properties button to make any changes to your Yahoo! Mail account; otherwise, click Close to return to Windows Mail.
Tell Windows Mail to leave a copy messages on the server
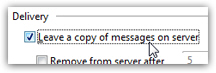 By default, Windows Mail will delete from your live Yahoo! account any emails it has successfully downloaded on your computer: to keep a copy of these emails on your live Yahoo! Mail account, click on Properties to customize your Yahoo! Mail account, and click on the Advanced tab: check the Leave a copy of messages on the server checkbox, to make Windows Mail will download copies of your emails, and leave the originals in your live Yahoo! Mail inbox.
Let Windows Mail download new Yahoo! Mail emails from the server
 Pretty quickly, Windows Mail will start checking for new emails in your Yahoo! Mail inbox, and downloading them to your hard drive (for later, possibly offline, viewing of your Yahoo! emails).
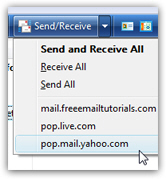
By default, Windows Mail will use the timeout settings before checking for new emails on your Yahoo! Mail and other email accounts: to download your Yahoo! emails right now, click on the Send/Receive dropdown menu, and choose pop.mail.yahoo.com - or whatever name you gave your Yahoo! Mail account during the setup process. Note that clicking the entire Send/Receive button, as opposed to the down-pointing arrow, will check for mail on all the email accounts you have setup inside Windows Mail.
Depending on the number of emails you currently have in your Yahoo! Mail inbox, Windows Mail may take a few minutes to download your emails!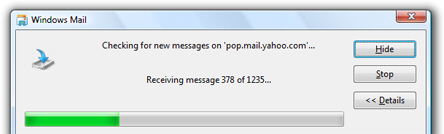
That's it for this free tutorial! This is how easily you can setup Yahoo! Mail in Windows Mail.