Setup Gmail in Windows Mail (IMAP or POP3)
 Windows Mail Gmail Setup: you can check your Gmail emails from a web browser like Internet Explorer or Firefox, but you can also setup Gmail in Windows Mail so that you can use your Gmail account from the comfort of a desktop email client like Windows Mail. This tutorial explains how to configure your Gmail in Windows Mail. Note that, unlike other popular webmail services like Windows Live Hotmail or Yahoo! Mail, Gmail is completely free, and does not place any restriction on using its service through a desktop application like Windows Mail. While this may change in the future, it is rather unlikely, since Gmail's track record on features and competitiveness has been to lead the way towards constantly more exciting features, while keeping the service both free and reliable.
Should you setup Gmail as POP3 or IMAP?
Also unlike other webmail providers, Gmail actually lets you choose whether to use POP3 or IMAP when connecting to its service from an email program like Windows Mail. Technically, it does not make much of a difference for end users like us, so it is a matter of preference: with POP3, you cannot create or manage email folders on the server. In other words, any email folder you create for your Gmail account inside Windows Mail will not be visible in your live Gmail account. But with IMAP, folders are "synchronized" between the live Gmail service you use inside a browser, and any desktop email clients you use to connect to the Gmail mail service. Since Gmail uses standard email protocols (IMAP and POP3), you can use literally any email program you want with Gmail (since support for these two protocols is ubiquitous.)We think that there are benefits to using IMAP, and the rest of this tutorial will therefore focus on Gmail setup as IMAP; but we will also give you the alternate settings for POP3 where applicable, to make sure that this tutorial is useful for both account setup types.
Enable POP3 / IMAP in your Gmail account
You will first need to allow POP3/IMAP access to your Gmail account: log into Gmail in the web browser of your choice, and click on Settings (top right corner of the screen). Then click on the Forwarding and POP/IMAP tab: make sure that under POP Download, POP is marked as enabled (if you plan on using POP3 for Gmail with Windows Mail). If you plan on using IMAP access, make sure that IMAP Access is marked as Enabled:
Setup Gmail in Windows Mail
Let's get started: to add Gmail in Windows Mail, go to the Tools menu, and choose Accounts; then, click on Add to create a new email account profile.
 In the Select Account Type dialog that Windows Mail, make sure that E-mail Account is selected, and click Next. Windows Mail will now collect your name, as you would like it to appear when using it to send emails using your Gmail account. (This is different from the name you have setup in your Gmail account, which will be used when you send emails using the "webmail interface", i.e. from a web browser.)
Type your full name, and click Next. Now type in your full Gmail email address, in the form "userName@gmail.com" (where "userName" is your actual Gmail user account name). Hit Enter or click Next to get to Gmail's incoming and outgoing mail server settings.
Now comes the part of this tutorial that varies depending on whether you want to connect Windows Mail to Gmail as IMAP or POP3:
Setup Gmail as POP3
To setup your Gmail account as POP3 in Windows Mail, enter pop.gmail.com as incoming mail server, and smtp.gmail.com as outgoing mail server.
Setup Gmail as IMAP
To use IMAP to connect Windows Mail to Gmail, enter imap.gmail.com as incoming mail server, and smtp.gmail.com as outgoing mail server. (Preemptive confirmation: same outgoing mail server settings for Gmail IMAP and Gmail POP3 - this is not a typo.)
Enable outgoing authentication
 In both the IMAP and POP3 configuration, make sure that the Outgoing server requires authentication checkbox is checked. This option instructs Windows Mail to use your credentials (your Gmail user name and password) before sending out emails. (This is simply a security measure that, among other things, makes it harder for spammers to use an outgoing mail server setting as junk mail relay.)
Now click Next: Windows Mail will collect the Internet Mail Logon information for your account. Type in your full Gmail email address as "userName@gmail.com", where "userName" is your actual Gmail user account name. Then, enter your Gmail account password.
The Remember password checkbox is checked by default: we recommend keeping this option enabled, unless you are sharing your PC with pranksters or untrustworthy roommates - otherwise, Windows Mail will ask you to manually enter your password at regular intervals, which will quickly drive you insane. Note that this decision is not final, and a later tutorial will show you how to change the Remember password setting one way or the other.
Customize Gmail port settings
 Click Finish to complete the email account setup.
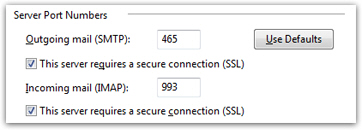
Now, making sure that your new Gmail account is selected, click on Properties, and navigate to the Advanced tab: for Gmail IMAP, your "server port numbers" should be as displayed on the screenshot.
Set the Outgoing mail (SMTP) to 465, with SSL enabled (check the This server requires a secure connection checkbox); then, set the Incoming mail (IMAP) port to 993, also with SSL enabled. And click OK to accept these settings.
For Gmail POP3, your port settings should as follows: 465 as outgoing port, with SSL enabled, and 995 as incoming mail server port, also with SSL checked.
Since a growing number of internet service providers are blocking port 25 for outgoing mail (in an effort to fight spam), we recommend that you use outgoing port 465, even if Gmail itself lets you use the standard port 25 for outgoing mail.
Gmail now setup in Windows Mail!
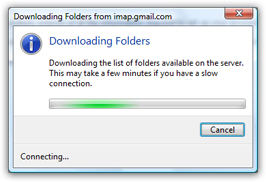
 You have successfully setup Gmail in Windows Mail: if you chose the IMAP option, Windows Mail will now start downloading email folders, and their content, from Gmail's servers.
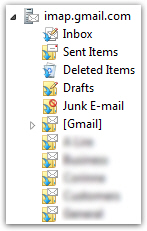
Notice also that the [Gmail] folder is flanked by a disclosure triangle: click it to reveal the standard Gmail "folders", displayed as children folders: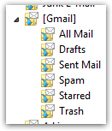
...And this concludes our tutorial on setting up Gmail in Windows Mail: you learn how to setup Gmail either as an IMAP mail service (recommended), or as a regular POP3 email account.