Setup an email account in Windows Mail (POP3 / IMAP / HTTP)
 This tutorial explains how to setup an email account in Windows Mail - the following tutorials will focus on popular webmail services like Windows Live Hotmail, Yahoo! Mail, Gmail, and AOL Mail more specifically, but we will now show you how to setup a regular email account like POP3 or IMAP, which is what many of you will be using as work email address; this is also most often what your internet service provider offers as email account type (Verizon, Bellsouth, Comcast, etc.)
Add a new email account in Windows Mail
The first time you run Windows Mail, it will automatically display the New email account screen; if you canceled that, you can add a new email account simply by going to Tools > Accounts to open the Internet Accounts dialog: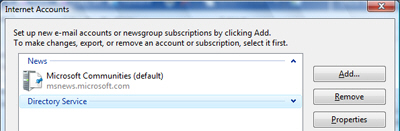
 To setup a new email account in Windows Mail, click on the Add button: from the Select Account Type dialog that opened, make sure that E-mail Account is selected, and click Next to start entering your email account information that will allow the email program to connect to the online mail service of your choice.
The next screen asks for your Display Name: type in the text field your name, as you would like it to appear to your email recipients when you send them emails from Windows Mail. Once done, click Next once more.
Windows Mail now collects your actual email address: enter the full email address you would like to setup, in the form "userName@emailProvider.com", and double-check that your email address does not contain any typo (otherwise the rest of the email account setup process will fail). Then click Next.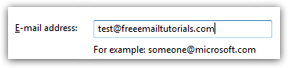
Email server settings
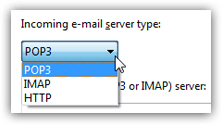 In the next screen, "Set up e-mail servers", Windows Mail now wants to know which email account type you are trying to setup: from the Incoming e-mail server type dropdown menu, choose POP3, IMAP, or HTTP. (Since this tutorial explains how to setup a generic email account in Windows Mail, we cannot know for sure which of this three values your email provider expects: make sure that you keep their email server settings information available as you follow our tutorial and actually setup the email account in Windows Mail.)
Enter the Incoming mail (POP3 or IMAP) server as supplied by your email provider, and then the appropriate Outgoing e-mail server (SMTP) name.
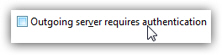 Notice the checkbox that reads "Outgoing server requires authentication" - here, Windows Mail needs to know if your email provider requires that you only log in to download your emails, or if you also need to login before sending out emails from your email account.
This checkbox is unchecked by default: leave it unchecked unless your provider tells you that their email server settings require what is called as "outgoing authentication".
Supply your email account credentials to Windows Mail
Click Next, and Windows Mail will display the Internet Mail Logon screen, where you will need to enter your full email address and your email account's password. By default, the Remember password checkbox is checked: this allows Windows Mail to remember your email account password for you, so you don't have to manually enter it every time you check your emails, or try to send an email out.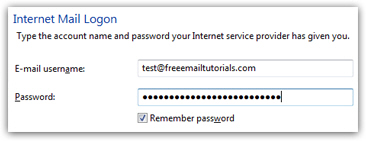
...And this just about completes your email account setup in Windows Mail: click Next.
Finalize email account setup in Windows Mail
In the final screen, labeled "Congratulations", Windows Mail confirms your email account setup, and offers you one last option: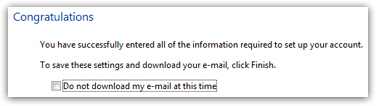
To leave a copy of your messages on the mail server (as opposed to deleting emails that have been successfully downloaded in Windows Mail), you will have to go through a different options and settings dialog. Check the Do not download my e-mail at this time checkbox to tell Windows Mail to postpone checking for new emails on the server after the email account setup is complete (which is different from the other option, discussed in a later tutorial).
Congratulations, you have setup your first email account in Windows Mail!
You are now ready to send and receive emails in Windows Mail: after you click the Finish button, Windows Mail will bring you back to the Internet Accounts screen we came from, at which point you will see the email account we just finished setting up, and you can modify other settings by selecting the account, and clicking on the Properties button to configure additional options. Enjoy your new email account in Windows Mail!