Create a contact group in Outlook Express (distribution list)
As you may know from previous tutorials, you can manually add contacts in Outlook Express, which is a great time saver that spares you from having to type full email addresses when you send emails, for example. But Outlook Express goes one step further by allowing you to create your own distribution lists, or "contact groups". A contact group is a virtual construct, or artificial entity, that lets you combine several existing contacts into a single address book entry: you can have, for example, a "Sales Team" contact group that includes everyone in your organization who is likely to be interested in receiving emails that relate to the sales department - and you can add and remove new "members", or email addresses, to that distribution list. This tutorial explains how to create a contact group, with just a few clicks in the address book window, and how to send an email to a distribution list.
Make a contact group in your address book
Follow these steps to add a new contact group:
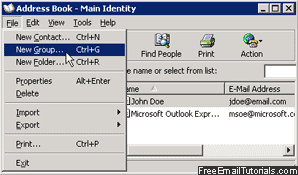
- Once inside Outlook Express, open the address book window: either press the Ctrl+Shift+B keyboard shortcut, or choose "Address Book" from the Tools menu.
- Once inside the address book, click on the File menu and choose "New Group" (you can also create a contact group by pressing Ctrl+G on your keyboard).
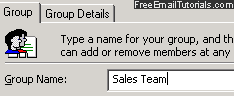
- Outlook Express will now open a new dialog: start by typing a label for this email distribution list inside the "Group Name" text field. Notice that the "Group" tab is automatically selected: the "Group Details" tab allows you to enter custom information about the group, or distribution list, just as you would for a regular contact.
- Then, click on the "Select Members" button to add people from your address book to the new contact group: in the "Select Group Members" dialog that opened, double-click on the contacts on the left to add them to the group; to remove a contact you accidentally added to the group, right-click on that person inside the "Members" scrollable list, and choose "Remove" from the context menu.
Tip: you can select multiple contacts at the same time by holding down the control key on your keyboard ("Ctrl"), and clicking on each contact, one after the other; to "unselect" a contact, simply click on it once more, while still holding down the control key - once all are selected, click on the "Select" button. - Also notice that if you want to add a new person to the contact group, someone not already inside your address book, you can click on the "New Contact" button at the bottom, and manually create a new contact from there!
- Once you have added members to your distribution list, click OK (you will now see these contacts listed as Group Members).
- Click "OK" once more to create the contact group and return to the address book.
This is all it took to add and create a new contact group in your Outlook Express address book: you will now see it listed inside the left hand pane; and when you click on it to select it, Outlook Express will show the current members of that group on the right hand side.
How to email a contact group / distribution list in Outlook Express
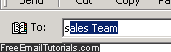
For all intents and purposes, Outlook Express handles contact groups just like it does regular contacts: when you compose a new email message, start typing the name of the contact group you just created, and it will AutoComplete as email recipient suggestion! The advantage of this approach is of course that it saves you from adding the email addresses of everyone in the sales team whenever you want to share some information with them. In the screenshot below, we just typed the first letter, and Outlook Express autocompletes by offering our contact group as email recipient: