Create an email rule in Outlook 2007 (Mail filters)
 Create email rules in Outlook 2007 or Outlook 2003 — Many of your emails follow a somewhat predictable pattern, which make them ideal for automatic mail sorting: Outlook 2007 lets you create email rules, or mail filters, to automatically move emails to folders, or delete emails, etc. - following a set of conditions you outline yourself. In this tutorial, we will explain how to create a new email rule, how to edit the filters of an existing email rule, and how to either temporarily stop an email rule from running, or delete the email rule altogether.
This tutorial was written using Outlook 2007 as example, but creating email rules works in a very similar way in Outlook 2003 or Outlook 2002.
How to add an email rule in Outlook
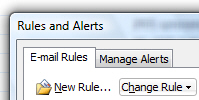
To create an email rule in Outlook 2007, go to Tools > Rules and Alerts: Outlook will open the Rules and Alerts dialog, which lists all the mail filters you have currently setup. By default, there is only one default rule ("Clear categories on mail"), which you can disregard. Otherwise, emails without email rules to redirect them, follow on of two paths: either they are delivered to your inbox, which is the case most of the time, and always for your contacts, or these incoming emails are placed inside the "Junk E-mail" folder, if Outlook perceives them to be spam. Let's start by creating a very simple email rule: click on the New Rule button. 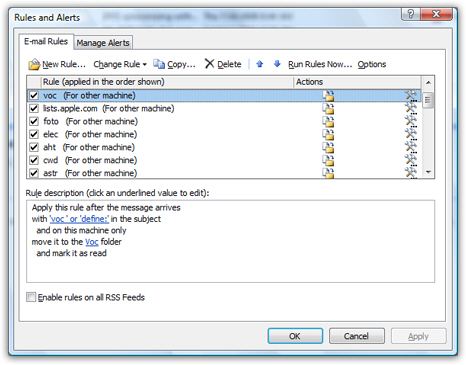
Customize the filters of your new rule
 Outlook 2007 will open the Rules Wizard, which will guide you through all the filters you can create for an email rule, how to name it, and when to start running it. Since the process is quite obvious after you have done it once, we will limit our options to basic filters, and let you explore more advanced rule possibilities on your own.
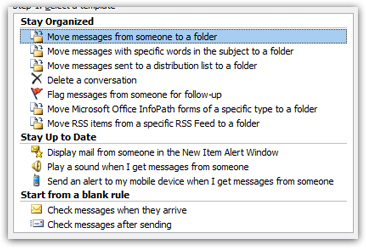 The first step is to choose one of 12 email rule types: under "Stay Organized", you will find the most common rule types, like automatically moving an email to a folder, based on sender, recipient, or subject. We will choose "Move messages from someone to a folder".
Notice that as you change the selection at the top (Step 1), the email rule criteria change at the bottom as well (Step 2). In our case, after choosing the first option, we now have to choose the sender, and the destination folder: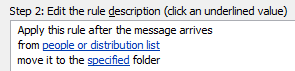
Each blue underlined piece of text is a clickable link: click on the "people or distribution list" to pick a sender, and then click on "specified [folder]" to choose (or create) the email folder in which matching messages should be moved.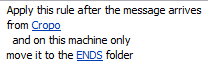
(Clicking on any of the links will allow you to change their value.)
Configure more advanced rules settings
For a basic email rule (only designed to move emails from a recipient to a particular folder, you could just click Finish to give a name to the rule, save it, and run it. For the purpose of this tutorial, we will show you what happens after this step. Click Next.
The following screen of the email rule wizard gives you additional conditions for your rule: you can use as many of them as you like: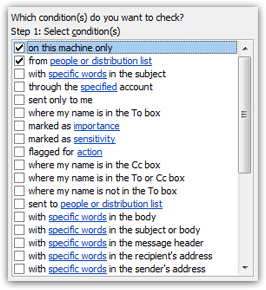
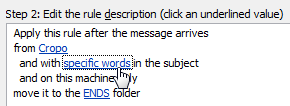 To enable an additional option for your rule, simply check the corresponding checkbox, and click on the link to define the variable. For example, if you check the "with specific words in the subject" condition, click on specific words (at the bottom of the window) to supply the words you would like to match with your rule; we typed three filters:
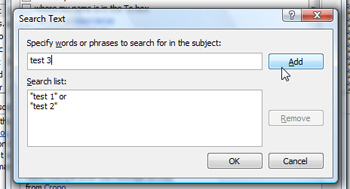
Click Next, and Outlook 2007 gives yet another set of options you can configure for your new email rule: in this case, Outlook lets you choose more than one action to apply to filtered emails, in addition to moving them to a specific folder.
Create exceptions to your rule
Click Next to load the final screen of the email rules wizard. Perhaps as important as the rules themselves, is the ability Outlook 2007 gives you to create exceptions to your rule: to take a tacky example, you may want to automatically delete all emails containing the word "Viagra", except if the email comes from your family doctor.
Select all exception conditions you want for your email rule: here too, Outlook 2007 lets you pick as many exceptions as you want. When you are done, click Next: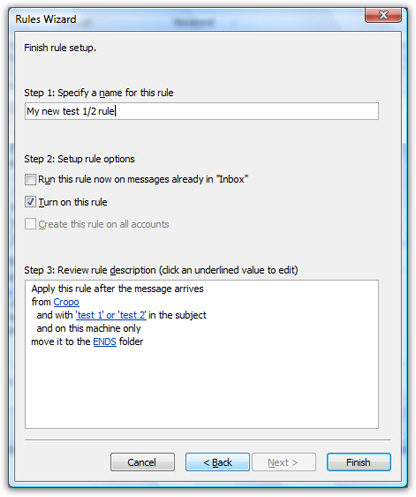
Pictured above is the final screen of the email rules wizard in Outlook 2007: it lets you type a memorable name for your email rule, and turn on the rule (the "Turn on this rule" checkbox is checked by default, to make the rule active).
If you want to run this email rule on emails that are already inside your main inbox, simply check the "Run this rule now on messages already in 'Inbox'" checkbox.
Click the Finish button to return to Outlook's Rules and Alerts dialog.
Outlook 2007 now shows the email rule you just created.
Pause an email rule
Selecting an existing email rule, as shown above on the screenshot, lets you perform various operations on it, using the toolbar. First though, notice that each email rule is flanked by a checkbox: uncheck that checkbox, and Outlook 2007 will disregard this email rule until you reactivate it by re-checking the rule's checkbox.
Delete an email rule
To completely remove an email rule from Outlook, select it and click the Delete button in the Rules and Alerts wizard. This action cannot be undone, so make sure you do consider first the option mentioned above, and simply pause the email rule instead.
Duplicate an email rule
 If you have spent time creating and/or customizing your email rules, Outlook 2007 lets you create a new rule based on an existing one: select the rule you want to duplicate, and click on the Copy button. Outlook will place a copy of the rule at the very bottom of the listing, and have it unchecked by default.
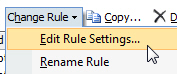 Select the duplicate rule, and click on the Change Rule button-menu combo: Outlook lets you give your duplicate rule a meaningful name ("Rename Rule"), and change the filter conditions to repurpose that rule as a new email rule ("Edit Rule Settings"). Also explore the remaining items of the Change Rule menu: they allow you to quickly add common effects to your rule without going through the email rule wizard.
Outlook uses a sophisticated iconography to summarize the actions a rule performs; once you become more familiar with email rules in Outlook 2007 or Outlook 2003, you will immediately be able to identify a rule by the set of icons that illustrate its effects.![]()