Change Opera user agent string (browser identification)
Whenever you surf the web, your browser request from a "web server" the pages you want to visit by clicking on links or typing URLs directly into the address bar. For each of these transactions, Opera (and other web browsers) also send a piece of information called "user agent string", which is a short piece of text that identifies the type of browser you are using, its version, etc. This information is used by web designers/developers and web servers to, sometimes, customize the content you receive based on the capabilities of the software you are using (also indicative of laziness when people have not tested their sites with less prominent web browsers like Opera!) In many cases, the reason you are facing difficulties when using Opera on some websites comes from this browser identification mechanism. Aware of this fact, Opera ASA (the browser maker) has built a "user agent switching" functionality into Opera, which allows you to pretend to be using another browser with either all websites or just the misbehaving ones, as you'll learn in this tutorial.
Change user agent string for a single website
An earlier tutorial explained how to make the Amazon.com reader work in Opera using that very technique: to summarize, you can tell Opera to appear as another web browser when you visit a particular website, and Opera will "remember" this setting, and automatically offer a different browser identification string when you visit one of these misbehaving sites.
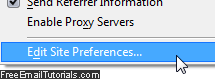 To force Opera to mask its identity for a particular site, navigate to it; once any of its pages has loaded, click on the "Tools" menu, and choose "Quick Preferences" - then, click on "Edit Site Preferences" (on Windows and Linux, you can also press F12 on your keyboard and pick this option from the menu that opens).
Select the "Network" tab from the "Site Preferences" dialog that opened, and pick another value from the "Browser Identification" dropdown. Click "OK" to apply the change: from this point on, Opera will "pretend" to be Firefox or Internet Explorer for this particular site.
Tip: If "Identify as Firefox" or "Identify as Internet Explorer" doesn't work, pick the "Mask as..." option instead for another browser.
Spoof Opera browser identification for all websites
If you want to make Opera pretend to be another browser for all websites, but still mention "Opera" in its user agent string, you can go through the "Opera.ini" configuration file, explained below. To completely hide any mention of Opera, you need to use the technique explained above and choose "Mask as..." (but you shouldn't need to do it often ).
As Opera fans, we recommend that you only use user agent switching as needed: that way, the webmasters of all other sites you visit will see the thousands hits (if not millions!) their websites get from Opera users. Everything counts!
Advanced user agent settings through "Opera.ini" configuration file: you can also access your "UA" user agent settings by clicking one of these two links, or typing them inside the address bar from within Opera:
opera:config#UserAgent|SpoofUserAgentID
opera:config#UserAgent|AllowComponentsInUAStringComment.
Here is the second setting, which includes a up/down counter text field: the default value of "1" is used to allow Opera to identify itself as Opera.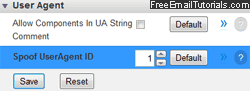
To change the global value ("all websites"), change the value; remember that 4 and 5 will be interpreted "globally" as 2 or 3, since masking can only be done on a site-by-site basis:1 = Opera (default setting)2 = Mozilla Firefox3 = Internet Explorer4 = Mozilla Firefox (Completely mask and hide any mention of Opera)5 = Internet Explorer (Completely mask and hide any mention of Opera)
Once you are done, click on the "Save" button; you don't need to restart Opera, but refresh (reload) any website currently opened to see the user agent string change applied to it.