Setup Gmail in Thunderbird
 Much of the experience of Gmail is unique to using Gmail inside a web browser. It is however possible to use your Gmail from an email client like Mozilla Thunderbird. And, unlike most other email providers, Gmail actually lets you choose whether you want to use its service from an email program as a POP3 email account or using IMAP. This tutorial will show you how to setup Gmail in Thunderbird as an IMAP email service; the first section discusses the advantages of using Gmail IMAP vs. Gmail POP3.
Should you setup Gmail as POP3 or IMAP?
With POP3, you cannot create or manage email folders on the server. In other words, any email folder you create for your Gmail account inside Thunderbird will not be visible in your live Gmail account. But with IMAP, folders are "synchronized" between the live Gmail service you use inside a browser, and any desktop email clients you use to connect to the Gmail mail service. Since Gmail uses standard email protocols (IMAP and POP3), you can use literally any email program you want with Gmail (since support for these two protocols is ubiquitous.)There are benefits to using IMAP, and the rest of this tutorial will therefore focus on Gmail setup as IMAP; while Thunderbird 3 lets you manually configure your Gmail account to use POP3, it will automatically configure itself to use Gmail as IMAP, which is the preferred option!
Enable POP3 / IMAP in your Gmail account
You will first need to allow POP3/IMAP access to your Gmail account: log into Gmail in the web browser of your choice, and click on Settings (top right corner of the screen). Then click on the Forwarding and POP/IMAP tab: make sure that under POP Download, POP is marked as enabled (if you plan on using POP3 for Gmail with Mozilla Thunderbird). If you plan on using IMAP access, make sure that IMAP Access is marked as Enabled:
Setup your Gmail account in Thunderbird
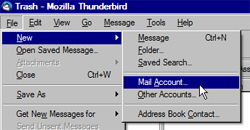 To add your Gmail account in Thunderbird, go to File > New > Mail Account. This will open the simple new email account setup screen in Thunderbird 3. (Since Thunderbird 3 makes it so much easier than previous versions to setup an email account, Gmail or otherwise, we recommend that you download your free copy from MozillaMessaging.com.)
You should now see Thunderbird's Mail Account Setup wizard.
Under Your name, enter your name as you want it to appear to email recipients when you send emails from Thunderbird using your Gmail account (note that this does not have to match the name you entered when first creating your Gmail account). Then, under the Email address field, enter your full Gmail email address in the form "userName@gmail.com". Finally, under Password, enter your Gmail account password.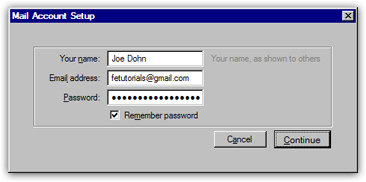
By default, the Remember password checkbox is checked: leaving it checked will spare you from having to enter your Gmail account password every time Thunderbird needs it - on the other hand, this convenience should be forgone if you have to share your computer with pranksters and other types of undesirable roommates.
Thunderbird auto-checks your Gmail account settings
Click on the Continue button: Thunderbird version 3 does all the heavy lifting, and will check all your Gmail account settings for you - once done, and within a few seconds, Thunderbird will display the following summary screen: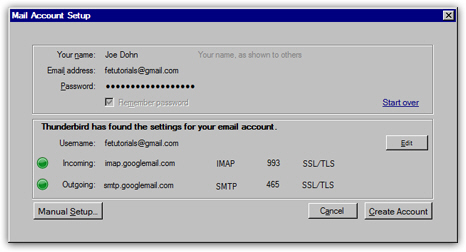
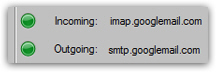 A green dot displayed next to the incoming and outgoing mail servers indicates that Thunderbird was successful in connecting to your Gmail account, using the credentials (email address and password) you supplied.
If you want to setup another Gmail account instead, you can click the Start over link; if you want to edit some of your account settings, click Edit; and finally, if you want to change the email account setup entirely (for example, to use Gmail as a POP3 account inside Thunderbird), click on the Manual Setup button. Otherwise, click on Create Account to finalize adding Gmail to Thunderbird.
Gmail successfully added to Thunderbird
Within a few seconds or minutes (depending on both your internet connection speed and the number of emails you have in your Gmail account), Thunderbird will create a new entry named after your Gmail email address under your global inbox: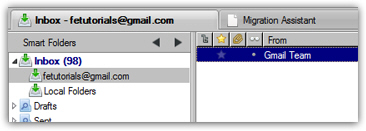
If yours isn't a test email account, you should by now see plenty of emails from your Gmail account! From this point on, anytime you receive an email sent to your Gmail account, and you reply to it from Thunderbird, your email reply will automatically use your Gmail account - regardless of the number of other email accounts you may have setup in the past inside Mozilla Thunderbird.
And this is all it takes to add your Gmail account inside Thunderbird 3!