Find emails in SeaMonkey Mail: Search Bar, Views, and Message Search
SeaMonkey Mail comes with three tools that allow you to search and filter your emails: the Search Bar, the Views, and the Find Tool - all explained in this tutorial. The advantages of the search bar is that you don't have to leave your inbox / current email folder - SeaMonkey will start filtering emails on-the-fly, based on what you type, or based on the view you picked. The disadvantages are that you cannot search in multiple folders at the same time, and that you can only filter by subject line (email title) or sender, or by an existing view (but as you'll see in this tutorial, you can create your own, custom views!) The advanced find tool is much more flexible and extremely powerful, but less "instant" and less straightforward. On this page: Search Bar | Quick Views | Find Tool.
Tip: it is worth learning how to use these tools beyond the obvious, built-in functionality, since you will likely perform the same (type of) searches regularly. Taking once the time to create a custom view or save an advanced find operation as a search folder will save you enormous time in the future!
The Search Bar
If you don't see the search bar, go to View > Show/Hide > Search Bar. Here's a screenshot of the search box you'll see on the right of SeaMonkey Mail's main window:![]()
Click in the text field, type a portion of text, and SeaMonkey will filter the current folder to show only messages that contain these consecutive characters in either the subject line or the address fields. No need to hit Enter / Return: within a second of the last character you typed, the incremental search will start; keep typing to narrow down your criteria. Hit the escape key ("Esc") to clear the search box and show all emails in that folder.
Note: clicking the "Advanced" button opens the advanced find tool, described in the last section of this tutorial (exact same result as going to Tools > Search Messages).
Quick Views (Filters)
If it is hidden, show the search bar by going to View > Show/Hide > Search Bar. On the left side, you'll see a dropdown menu that looks like this: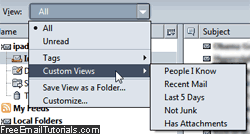
- "All", selected by default, shows all emails (read and unread)
- Select "Unread" to only hide read messages.
- Pick an option under "Tags", formerly called "labels", and SeaMonkey will only show emails that were tagged that way (how to use email tags).
- Using the "Custom Views" submenu, you'll be able to filter your emails by:
• "People I Know" - only show emails from contacts.
• "Recent Mail" - temporarily hide all old messages in the current folder.
• "Last 5 Days" - hide all emails received over five days ago.
• "Not Junk" - temporarily hide all spam in that folder.
• "Has Attachments" - hide all emails that do not contain file attachments; depending on which program senders used, "inline images" may be perceived as attachments. - "Save View as Folder" lets you to pick a name to save that search/filtered view for future use: you'll be able to apply it to any other folder, with a couple of clicks!
- To create a custom view, choose "Customize", and click on "New" when the dialog opens: it allows you to create a quick rule that is applied on demand: to familiarize yourself with the process, see our mail filters (email rules) tutorial for SeaMonkey.
The Find Tool ("Search Messages")
For cross-folders and more advanced searches, use instead the find tool: either click on the "Advanced" button in the Search Bar, or go to Tool > Search Messages (or use the Ctrl+Shift+S keyboard shortcut). Here's the blank Search Messages window: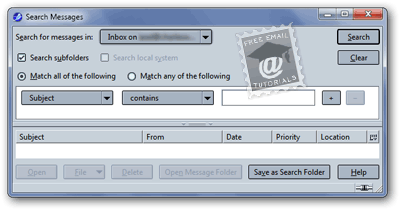
Side info: the Tool > Search Addresses command lets you lookup contacts by email address, name, or any other piece of data in a contact's profile (in the SeaMonkey address book).
- Start by selecting an email folder in the "Search for messages in" dropdown.
- By default, SeaMonkey will "Search subfolders" (uncheck that checkbox to only find emails in the selected location).
- If you leave "Match all of the following" checked, SeaMonkey will only show messages that match every single condition you add. Pick "Match any of the following" to get as result emails will match just one (or more) of these.
- Click the Plus sign to add search criteria, or the Minus button to remove another.
- Click "Search" to start loading matching messages in the bottom pane, like a regular email folder; the number of matches found is indicated (bottom left corner).

- The buttons at the bottom allow you to perform special operations on the emails you selected in the result set, regardless of their current location, status, etc.
• "Open" will load the selected message(s) in their own window - just double-click on a message for the same result - avoid opening too many emails at the same time.
• Click "File" to store the selected email(s) in a specific folder.
• "Delete" will move the selected messages to the Trash folder (unless they already are in it, in which case they will be permanently deleted).
• The "Open Message Folder" button will launch a new SeaMonkey Mail window, with the containing folder automatically opened (selected on the left).
• Click "Save as Search Folder", and SeaMonkey will create a "virtual" or "dynamic" folder: whenever you select that folder, it will load a real time listing of emails that match the criteria you picked; if you allowed to search subfolders, it will filter messages from your entire account! Type a name, choose where to add that search folder, optionally refine your scope or search criteria, and click "Create".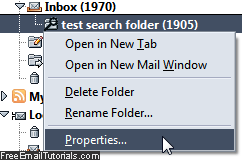
• Back in SeaMonkey Mail's main window, right-click on your search folder to delete it or rename it; choose "Properties" to customize its settings in the future. - Click "Clear" to start a new search, or hit the Esc key to return to SeaMonkey.
Caution: while the search folder itself is virtual, it contains references to the actual messages from your other folders. Deleting a message from a search folder will delete the actual email - both its representation inside the search folder, and the "real" message, wherever else it might be.