Import email account settings, contacts, and messages in SeaMonkey Mail
SeaMonkey Mail makes it easy to switch to by offering three import tools: import email account settings from other email programs, which spares you from manually entering all your account setup information; import address book contacts from other sources; and finally, import old email messages from other email clients! This smooth transition removes any objection to trying the Mozilla Foundation Internet Suite's email program! This tutorial explains how to import these three types of data, typically in under 5 minutes! Jump to: import settings | import contacts | import emails (all on this page!)
Caution: to avoid any errors during the import process, exit out of any email programs or address books from which you are about to import (this is because these files are often "locked", and cannot be accessed by any other process while those programs are running).
Tip: if you choose the new "Import Everything" option, it will limit your choices to programs like Thunderbird. Select individual items to import to get more flexibility (note).
Import Settings
 SeaMonkey Mail lets you import general settings from Microsoft Outlook, Outlook Express, or Qualcomm Eudora , Thunderbird (also created by Mozilla), and many more email programs.
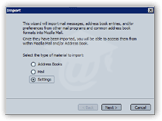
To import your email account settings from other email programs, select "Import" from the Tools menu. go to Tools > Import: choose "Settings" in the wizard that opened, and click Next.
You will receive a confirmation message if the import process went smoothly - click Finish. To see (or confirm for yourself) what email accounts were imported, go to Edit > Mail & Newsgroups Account Settings - all accounts currently setup are listed on the left!
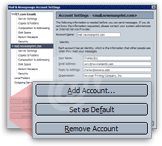 Removing Unwanted Email Accounts - SeaMonkey will automatically import all the email accounts it found in the target email program; if that includes some accounts you don't want to use, just delete them manually from SeaMonkey as follows: in the same "Account Settings" dialog, select the unwanted email account and click on the "Remove Account" button. Accept the confirmation, and keep going until you only have the email account(s) you actually wanted to import.
Import Contacts
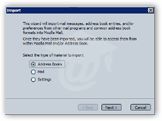 Go to Tools > Import once more to import contacts into SeaMonkey Mail: select Address Books and click Next.
Choose the email program from which you will import your contacts, or pick Text files, which supports LDIF, tab-delimited or comma-separated files.) "Outlook" should work for all versions; "Outlook Express" should work for Outlook Express, Windows Mail, and Windows Live Mail. Click Next.
You'll receive a confirmation message if the import was a success. Click "Finish".
Note: view your contacts at any time by choosing "Address Book" from the Window menu of any SeaMonkey applications, or by pressing the Ctrl+2 keyboard shortcut (note). If you had distribution lists setup, they should have been imported as well, and will appear as sub-entries inside the left pane.
Import Emails
If you are switching to SeaMonkey Mail from another email application, you don't need to lose all your old emails! You should be able to import them all if you use a popular email program like Outlook, Outlook Express, Windows Mail, Windows Live Mail, or Thunderbird. From SeaMonkey Mail's main window, click on the Tools menu and choose "Import".
Choose "Import Everything" for Thunderbird; otherwise, select "Mail". Click Next. Choose "Eudora", or "Outlook" for any version of Microsoft Outlook, or "Outlook Express" for free Microsoft email programs like Outlook Express, Windows Mail, or Windows Live Mail.
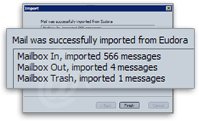 Click "Next" to launch the import process; typically within a few seconds, you will get the following confirmation message (variable based on the option you picked).
Click Finish to return to SeaMonkey: you'll now have not just your old emails, but also all email folders and their content listed in the Folder Pane (left side).