Create an email signature in SeaMonkey Mail
Instead of manually typing your name and contact information every time you send a message, SeaMonkey Mail lets you create an email signature, which will automatically be added to each message you compose (new, replies, or forwards). This tutorial show you how to set one either in plain text, using HTML and images, or attaching a signature from a text file up. In addition to, or instead of, a regular signature, you can also have SeaMonkey automatically attach a vCard to your messages.
Attach a signature to an email account
Click on the Edit menu and choose "Mail & Newsgroup Account Settings": when the dialog opens, select your email account on the left (see the note below: you can have one separate signature for each email account you have setup in SeaMonkey).
 Here are the "Default Identity" settings you can configure: the first 4 fields are not part of your signature itself, but you should make sure that they match at all times: the Name field will appear in your recipients' inbox, regardless of the name you've entered in your signature.
To create your signature, just type the information you want in the "Signature text" box: each line you enter will also appear as a separate line inside your emails. You should typically have one piece of information per line, and should answer the following:
• Who is this sender? (name)
• What is their role? (job title)
• For what organization to they work?
• How can I contact them? (email, phone, fax...)
Tip: keep in mind that many people still print emails; your messages may not be read in the context of an email program, where clicking "Reply" automatically includes your email address. does the trick: so, including your email address and website URL makes sense for a printed page, possibly read offline!
Add formatting to your signature
By default, SeaMonkey uses plain text for your signature: no text colors, formatting of any kind (bold, underlined, italics...), or images. To add formatting, check the "Use HTML" checkbox, and enter your format information in HTML code. Here are simple examples:
• Some <b>bold</b> text
• Some <u>underlined</u> text (avoid except for links)
• Some <i>italic</i> text
• A <a href="http://www.freeemailtutorials.com/">clickable link</a>
• Use "<br>" for new lines
• And type "<hr>" for a horizontal separator.
Add a picture in your signature
The easiest way to include an image is to first upload it, or use a picture that is already online. All you need is the "URL" (website address) of the image, and you'll paste it as follows (right-click on an image and choose Properties or View image info to get its URL).
• <img src="http://www.freeemailtutorials.com/i/FET.png"> (replace with the correct URL)
To include an image from your computer, use the same HTML tag, but replace the image's source with the path of the picture on your hard drive, like this:
• <img src="file:///C:/Users/UserName/Desktop/FET.png"> (replace with path on your PC / Mac)
Side info: with images in the signature, your emails may appear as having attachments. In our tests, Outlook 2010 understood that the image was really "inline", and did not show the paperclip icon next to the message; in Hotmail, however, the email appeared as having a file attachment (note).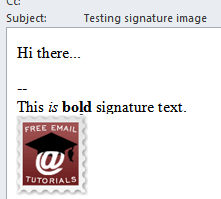
Attach a signature file
If you have an HTML or text file on your computer which includes your signature text or code, check instead the "Attach the signature from a file instead" checkbox, and click "Choose" to add your signature file from your hard drive. To include information not feasibly included in a normal signature, you can also check the "Attach my vCard to messages" checkbox, which will allow recipients to quickly add your contact information to their address book.
Click "OK" to save your settings and return to SeaMonkey Mail; the next time you compose a message (tip: use the Ctrl+M keyboard shortcut anywhere in SeaMonkey), that signature will automatically be included. To send a particular email without a signature, simply select it erase it by pressing Delete: it is regular text inside the message's body.
Side info: the double-dashes (two hyphens like this "--") that precede your signature are automatically added by SeaMonkey (and Thunderbird, also made by Mozilla), to observe a standard convention most other email programs ignore. You can safely -and manually- delete them every time, by you cannot prevent SeaMonkey from automatically inserting them.
Note: SeaMonkey allows you to have a different signature for each email account. It will know which to use as follows:
• If you are forwarding or replying to a message, it will automatically insert the signature corresponding to the email account that received that message.
• If you are composing a new email, it will use the signature for your default email account: to change both the signature used and the email address with which you send that message by picking a different option under the "From" dropdown menu:![]()