The Apple Mail Interface
This tutorial will give you a brief overview of Apple Mail's main interface elements: the main toolbar, that you will use all the time, and the mailboxes, where your emails will be stored.
Apple Mail's Main Toolbar
Apple Mail's main toolbar lets you control 80% of your email activity:
When buttons on the toolbar are faded, Apple Mail is signaling that the button's function is not available at the moment. For example, when no email is currently selected, email-related actions cannot be performed (Apple Mail wouldn't know on which email to apply the command):
The Main Toolbar's Buttons
 The Delete button deletes the email currently selected. But actually, it moves the selected email to the Trash mailbox. This means that you can still recover an email you might have deleted by mistake. Just go to the Trash mailbox, and drag the email back to the In mailbox.
 The Reply button opens a new email, containing the text that was sent to you, and automatically addressed to the sender of the email to which you reply. Even if the original email was sent to more than one recipient, "Reply" will only send the reply to the sender.
 The Reply All button performs the same function as the Reply button, but is useful when you wish to reply not only to the sender of the original email, but to all its recipients as well. Reply All saves you the trouble of having to pick manually all the recipients from the original email.

The Forward button creates a new copy of the selected email, with a blank "To:" field. A copy of the email will be sent to the recipients of your choice.

The New button creates a new, blank email. If you have setup automatic signature, it will be inserted in the body of the new email. (For more information on how to create an email signature, please see the Email Signature tutorial.)
 The Mailboxes button pulls into view the "drawer" that contains your mailboxes. Mailboxes include the built-in mailboxes (In, Out, Drafts, Sent, Trash, and optionally Junk), as well as any mailboxes you will create. (For more information on how to create your own mailboxes, please see the Using Mailboxes tutorial.)
 The Get Mail button checks the mail server for new emails for all your accounts. By default, Apple Mail checks the mail server periodically for all email accounts with automatic check enabled - it is by default. (The Email Account Settings tutorial covers preferences on enabling/disabling automatic check for new emails.)
 The Junk button allows you to tell Apple Mail that a certain email should have been caught as junk mail. By default, Apple Mail is in "Training Mode" when it comes to junk email filtering. It learns to root out junk mail with your help. (The Spam & Junk Mail tutorial covers Apple Mail's Training Mode and junk mail filtering.)
Apple Mail's Mailboxes (Folders)
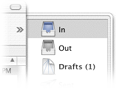
Apple Mail comes with five default "Mailboxes", initially hidden in a "drawer"; click on the right side of apple mail to pull the drawer into visibility, or click the Mailboxes button.
Drag the right side of the drawer to determine how much of it is visible.
If you have been using Outlook Express or Mozilla Thunderbird, Apple Mail's "Mailboxes" correspond to what other email clients call "Folders".
 The In Mailbox, or inbox, is the receptacle for all new emails. As many subfolders of the In folder will be created as there are active email accounts in Apple Mail.
 The Out Mailbox temporarily stores all outgoing emails. If you are working without a connection to the Internet, emails you send will be stored in the Out Folder until one becomes available.
 The Drafts Mailbox stores all unsent emails. Example: you decide to write an email, but get interrupted, close the email, confirm your intent to save it, and you will be able to resume its redaction at a later time by retrieving it from the Drafts.
 The Sent Mailbox contains copies of all emails successfully sent. These emails can be deleted at a later time, or you can modify this default behavior, (see tip below.) As many subfolders of the Sent folder will be created as there are active email accounts in Apple Mail.
 The Trash Mailbox folder contains all deleted emails.
To change Apple Mail's default behavior regarding sent, deleted and junk emails, go to Mail > Preferences; under Accounts, click the Special Mailboxes tab, and choose your preference from the Erase copies of sent messages drop-down menu.