Outlook 2003's Customize Dialog: Toolbars
Outlook 2003's Customize Dialog centralizes most customizing commands otherwise scattered throughout hidden context menus and alt-drag shortcuts.
To open Outlook 2003's Customize Dialog, go to Tools > Customize, or right click on menu headers or toolbars and choose Customize from the context menu.
Customize Toolbars in Outlook 2003
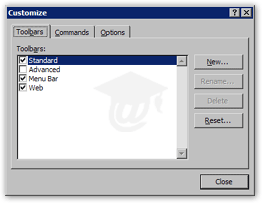 The Toolbars tab in Outlook 2003's Customize dialog allows you to toggle toolbar's visibility, as well as create and manage new, custom toolbars.
The four default entries are Standard, Advanced, Menu Bar and Web. The three default toolbars cannot be deleted or renamed.
The Menu Bar entry represents Outlook 2003's drop-down menus (File, Edit, View, Go, Tools and Help), and is there more out of consistency than anything else: it cannot be renamed or deleted, and its visibility cannot be toggled either.
Likewise, the Rename and Delete button are only available for custom Outlook toolbars. The section below shows you how to create your own toolbars in Outlook 2003.
Resetting a Toolbar
The Reset button allows you to reset the toolbar currently selected: it will add or remove the default set of buttons for one of the three Outlook 2003 toolbars.
Note that this will not delete your custom toolbars; rather, it will reset the buttons showing on the Standard toolbar, ignoring changes you may have made to the Web or Advanced toolbars.
Creating a Custom Toolbar in Outlook 2003
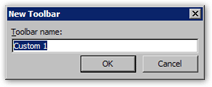 To create a new toolbar in Outlook 2003, click the Customize Dialog's New button.
The New Toolbar dialog will open, and let you type a name for your custom toolbar. Hit [Enter] or click OK to validate your choice.
 Your toolbar name will now appear in the toolbar listing; the new toolbar is checked and visible by default.
A floating toolbar will appear next to the customize dialog. Until you add commands to your toolbar, it is simply an empty container.
Adding Buttons to a Custom Toolbar in Outlook 2003
To add button to your blank toolbar, click on the Customize Dialog's Commands tab. It shows a listing of all commands available in Outlook 2003, organized by default menu or topic.
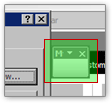
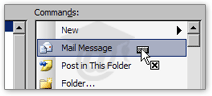 To populate your blank toolbar with command-buttons, select on the command you want and drag it from the Customize Dialog and drop it on top of the toolbar.
As soon as you start dragging, your mouse cursor will change appearance. To cancel a drag-drop operation, simply drop the button away from the new toolbar.
 When dragging a command button over an Outlook 2003 toolbar, your cursor will show a (+) sign, indicating that you can now drop the button.
You will also see an insertion marker indicating the position at which the button will be placed on the toolbar.
 Tip: to create vertical separators between your toolbar buttons, simply drag the button a couple pixels to the right, and then release. To remove a toolbar separator, drag the button on the right of the separator on top of the separator, and release.
Positioning Your Custom Toolbar in Outlook 2003
By default, your custom toolbar will float around the screen after you close the Customize Dialog. Double-click the toolbar's gray title bar to dock it with the other toolbars.