Outlook 2003's Customize Dialog: Commands
 Outlook 2003 comes with preset menus and commands. It is possible, however, not only to add commands to existing menus, but even to create your own menus and sub-menus.
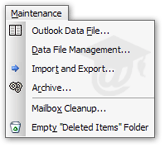
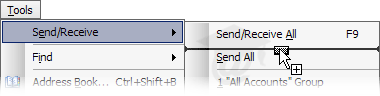
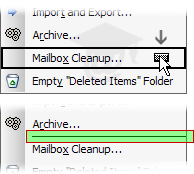
Pictured left, a custom "Maintenance" menu that groups Outlook 2003's general maintenance commands.
To open Outlook 2003's Customize Dialog, go to Tools > Customize, or right click on menu headers or toolbars and choose Customize from the context menu.
Customize Commands in Outlook 2003
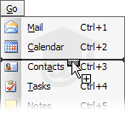
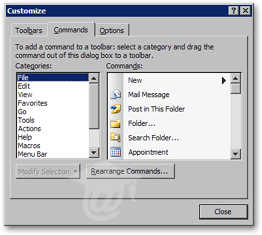 To preview a listing of all commands available in Outlook 2003, click on the Commands tab of the Customize Dialog. Under Categories in the left column, all existing menus are listed: File, Edit, View, Go, Tools, Actions, and Help.
In addition, available pre-built menus include: Favorites, Macros, and Menu Bar. Categories also lists Outlook 2003's three toolbars: Standard, Advanced, and Web.
Finally, the last item in Categories is New Menu, which as we'll see enables you to create your own menus in Outlook 2003.
Adding Commands to Menus in Outlook 2003
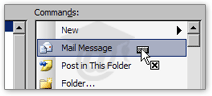 To add a command to a menu in Outlook 2003, find the command you want in the Customize Dialog, and start dragging it towards the menu headers.
Then, simply drag the command over the menu in which you want to see it; the menu will automatically unfold.
 A horizontal insertion bar lets you know where the command will be placed; when satisfied, drop the command: it is now part of the menu.
If you change your mind in mid-course, drop the command anywhere outside a menu or toolbar, and the drop operation will be canceled.
To remove a command from a menu, drag it out of the menu while the Customize Dialog is open, and drop it anywhere.
To preview the result, click the Customize Dialog's Close button and check your menu.
Adding a Command to a Sub-menu in Outlook 2003
Outlook 2003 also allows you to add commands to sub-menus. Instead of dropping your command on the main menu, hold it for one second over the sub-menu header (with a right-pointing arrow), and the sub-menu will appear.
The same way you inserted a command on a main menu, position the insertion line where you want the command to appear, and release the mouse button.
Creating Custom Menus in Outlook 2003
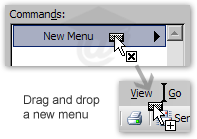 To create a brand new menu in Outlook 2003, scroll down to the last item under Categories, "New Menu", and select it.
Drag the New Menu item: it can be dropped somewhere in Outlook's Menu bar (where the File, Edit, View, etc. menus are), or dropped on a toolbar.
Like commands, a vertical insertion bar will appear to guide you. On the left screenshot, a New Menu is about to be dropped between Outlook's View and Go menus.
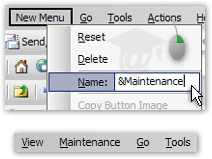 By default, your new menu will be called "New Menu", and be empty.
Let us start by giving it a meaningful name: right-click on "New Menu", and click in the text field next to Name in the context menu that appears.
In our case, we want a maintenance menu; we typed an ampersand sign ("&") before the M of Maintenance on purpose, to make an accelerator key.
An accelerator key allows you to access a command with the keyboard. the F of File menu is underlined, indicating that holding down the Alt key and the letter F will unfold it: Alt+F unfolds the File menu. In our case, Alt+M will unfold our Maintenance menu.
Adding Items to a Custom Menu in Outlook 2003
 To populate the new menu you created in Outlook 2003, drag commands from the listing to your menu.
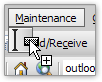
To add the first item, drag the command over the menu name ("Maintenance") and hold it over it for a second: the empty menu will unfold. At that point, drop your command over the empty unfold.
Keep adding items until your menu is complete; to change items' position, simply re-arrange the items by dragging and dropping above or below each other on the menu.
Adding and Removing Menu Separators in Outlook 2003
 To add a menu separator in Outlook 2003, drag a menu item one pixel below itself, and release.
A horizontal separation line will appear above the menu item you dragged down, and below the item above.
To remove a horizontal separator, open the Customize Dialog, select the menu item below the separator, drag it upwards slightly, and release the mouse button. The separator has disappeared.